| |
The Gadgets Page.
On this page Ill be looking at various electronic devices mostly ones that can be connected to your computer as well. But some things that arent intended for that as well. Choose from the table what you want to read about. Use the T & B ball doodads at the top left to jump between the top & bottom.
 Check out the new Electronic Circuits Page as well! Check out the new Electronic Circuits Page as well!
The Cowon S9
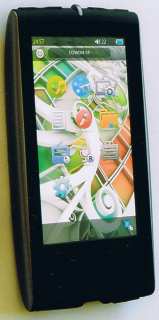  My Panasonic portable CD player has seen better days since 1998. A couple of years back or so I had to get the flexy connecty thing that joins the lid to the base replaced, which cost a bit. Overall though it’s been excellent; it can play for 52 hours on 4 AA size batteries, mutes data tracks on game CDs and has Anti Shock Memory 2. This is a bonus when you have a bunch of random tracks programmed, as you notice no seek time, because it’s reading ahead. How much longer it’ll keep going, I don’t know, so that’s one of the reasons why I wanted to get a portable music player. The other reasons are the amount of stuff they can hold, their size and weight, plus they’ve got all static parts, so there’s no bits that should wear out. Well not straight away. My Panasonic portable CD player has seen better days since 1998. A couple of years back or so I had to get the flexy connecty thing that joins the lid to the base replaced, which cost a bit. Overall though it’s been excellent; it can play for 52 hours on 4 AA size batteries, mutes data tracks on game CDs and has Anti Shock Memory 2. This is a bonus when you have a bunch of random tracks programmed, as you notice no seek time, because it’s reading ahead. How much longer it’ll keep going, I don’t know, so that’s one of the reasons why I wanted to get a portable music player. The other reasons are the amount of stuff they can hold, their size and weight, plus they’ve got all static parts, so there’s no bits that should wear out. Well not straight away.
Two formats the player had to have are FLAC and Ogg (which is actually a container, since you can have FLAC audio in an Ogg file), as well as the usual MP3 format. Since about 2006 I started compressing my audio in Ogg Vorbis and recently I decided to try out FLAC because of the whole lossless thing. It’s great for backing up my CDs and cutting back on the size, and with the kind of disk space you get these days, you probably don’t really need to compress the hell out of your stuff. The other players I looked at which did this, were the Philips GoGear Muse and the Samsung YP-R1. I’d heard the GoGear Muse had some issues with slow start up times and even some unreliability, and with the YP-R1, some of the stuff about it wasn’t quite my
cup of tea. I had considered the rather popular Apple iPod early on, but found that the lack of format support made them unsuitable. You seemed to be pressed into using iTunes also, and I don’t even use that on my Macs, let alone downloading it for my PC. Although I think you can actually use an iPod without it, but I don’t know if they support the MSC way at all.
Unlike the iPods, other brands of players in Australia seem to be few and far between. Dick Smith stocks the Philips players, although the Muse was available in New Zealand before here, JB Hi-Fi has a lot of the iRiver stuff, but as for Samsung, I couldn’t find anywhere that stocked their players, despite ads in the train stations and all. I’d read about the Cowon player earlier on, but it seemed a bit expensive, but when I went back to re-reading reviews on it, I discovered a place here in Australia that was a lot cheaper than overseas prices. I got this good deal from Minidisc Australia, for a price of $289, not including postage fees and all that. It worked out significantly cheaper than British prices and was comparable to prices from America also, which would’ve worked out more expensive with the postage costs. (Unlike buying fountain pens.  ) )
The battery life is better than some of the competition also, with 55 hours of playback for audio and 11 for video, and you can recharge via a USB port or an optional charger, which is about 2 hours
quicker.
You’ll also find the ability to play Flash files too. Whether this can be extended to playing FLV files, I don’t really know, but it would be interesting to suddenly add another video format. Finding stuff that’s compatible though seems a bit tricky.
There’s also a built in FM radio, which is a nice little addition. I haven’t listened to anything on the radio for years, but it’s probably worth giving a burl. If you set it to Japanese, you can go back to about 76 MHz or so, although I don’t know if anything’s being broadcast in Australia around that frequency. A nifty little calculator is included too, which I think is a great addition. I’m always trying to calculate some malarkey at odd moments.
Other features include a text file viewer, notepad you can draw on, plus a dealie you can type on, up to about 200 bytes.
Now let’s talk about the size — all in all it’s not much bigger than a small mobile phone or an 8 mm video camera cassette. The weight’s just 77 g. Quite a bit lighter than my case of CDs and my CD player, which come to 2.275 kg. That’s currently not even a full case of CDs either.
Okay, so what kind of stuff can you play on this thing? Here’s a look at the formats supported: MP3, OGG, FLAC, WAV, APE (up to HIGH level compression), & WMA. So no AIF, if you’re more Mac orientated, but you can always convert them to FLAC pretty easily. As for videos, Microsoft’s crusty WMV format gets a whirl, MP4, plus DivX and XviD AVI files too. Unfortunately there’s no support for QuickTime movies, which have tended to become more numerous since I got my MacBook, but not many players support these anyway. You can view JPEG images as well. So it’s fairly flexible in that sense, although they don’t seem to be antialiased when you zoom in, or if they’ve been resized to fit the screen. I was more concerned about the audio format support than anything else.
With 15.3 GB of flash memory, storage space is adequate if you’re using lossless audio formats, and more than plenty for Ogg and MPEG Layer 3. Once you start popping videos on it of course, the space goes down quite quickly. But you’ll probably find yourself changing your files around from time to time on your computer. The instructions actually mention Linux and Macs as well! Although the software that you get on the little 8 cm CD in the box is just for Windows.
The screen resolution is 272 × 480 pixels in 24 bit colour, presented on a LED display rather than a LCD. The result is vastly improved animation, based on the fact that LEDs have an extremely fast response to being turned on and off. The
viewing angle is quite impressive also. So both these qualities bring it closer to being on par with a CRT. So none of that inverted or washed out business caused from different perspectives, and no blurriness of quick movements. You can also rotate the player to a landscape sorta view, which is good when it comes to videos. The visible image size is about 4 cm × 7.2 cm.
File transfer is easy enough. You just bung it in MSC (Mass Storage Class) mode, and drag your sounds and videos to the appropriate folders. You can also add album cover images to each folder called “cover.jpg”. So none of that needing Windows Media Player or iTunes bollocks.
If you could really be bothered, you can actually update the firmware on this gizmo too. But knowing how much I hate having to update things, that’ll probably never happen, ’cos stuff like that just seems like a joke. What’s next, updating TVs and wrist watches? Purlease. But whatever.
All in all this is probably one of the better players out there, especially if you want to actually play some varied audio formats, (unlike most of the iPods and the Zune,) and don’t want an insanely high resolution screen.
Apparently the S9 uses a dual core 500 MHz CPU, which gives it a bit of oomf for videos which are bigger than the display resolution too. (All videos are re-sized to fit, although there are a couple of adjustment functions. And yes they are filtered on re-size unlike the pictures.) The start up time is around 6 seconds, although if youve added files to it, it may take a couple more. I wouldnt tolerate
anything more than about 20 seconds anyway from such a device.
The touch sensitive area is a capacitive type dealie, so you can only use your fingers and smear up the nice clean screen. I got it to work through some thin gloves though. I also got a stylus that works with this, although it’s very fat and doesn’t work well for sliding movements. But it does keep your fingers off. Everyone who’s attempted to touch my computer monitor gets told off, so it needs to be the same with this. :-)
The included headphones have one of those odd lop-sided cords, which I find annoying, so I just stuck with my Panasonic headphones. The USB connecting cable has a not so common plug for the player side, but apparently these are replaceable.
Sometimes the correct folders that are supposed to be shown in the music or video section screw up, and it goes off to some other location. Ive also had 2 instances when the favourites list goes weird, and you cant select stuff, plus it has the wrong files at the top, separated by a large space. Turning it off and back on fixes the problem.
Be aware that if youre using a S9 with Mac OS X, you need to eject / unmount it before you put your computer to sleep, turn it off or restart it, or you will corrupt the file system. Ive done this at least twice now. The 1st time around, Mac OS Xs Disk Utility couldnt fix the error, although Windows XP could.
The 2nd time, I had to reformat the (flash) memory, and copy everything back on! And with USB 1 speeds on the S9, it took an age. So, remember to turn your brain on, and safely remove it 1st. In Windows though, the OS seems to unmount stuff correctly on shut-down anyway, so it isnt such a big deal.
So all in all, I think I’d recommend one of these nifty players.
If youre interested in converting a DVD to watch on your S9, (For personal use!) check out my guide. This is using HandBrake and MP4 Cam 2 AVI for Windows XP or later. (You can get HandBrake for Mac OS X and Linux too.) If you have a Mac, I also have a simple guide for Mac OS X Tiger & Leopard.
The JohnStick, Or Thereabouts
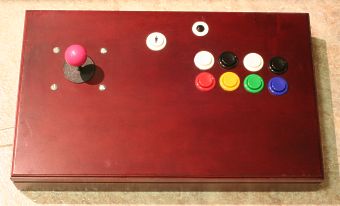 I can’t live without a proper 6 button layout for gaming. Sony wrecked joypads forever more when they decided 4 was all you needed on the front, and now nearly every computer control pad is just a knock off. Apart from the ultra rare Sega USB Saturn style pad, stuff with 6 buttons is few and far between, especially if you want to use such a device on Mac OS X, like me. So I considered a joystick. The 1st one I looked into was the well known X-Arcade. But that changed when I recalled OzStick, the Australian joystick dudes. They had a Fighter Stick, but after calling them, it turned out that it didn’t work on Macs. Boo! & then I found out it was actually a Mayflash joystick, because I saw one exactly the same on another site. So it wasn’t even their own product. I pondered about what I was going to do for a while, and then decided I’d make my own! I can’t live without a proper 6 button layout for gaming. Sony wrecked joypads forever more when they decided 4 was all you needed on the front, and now nearly every computer control pad is just a knock off. Apart from the ultra rare Sega USB Saturn style pad, stuff with 6 buttons is few and far between, especially if you want to use such a device on Mac OS X, like me. So I considered a joystick. The 1st one I looked into was the well known X-Arcade. But that changed when I recalled OzStick, the Australian joystick dudes. They had a Fighter Stick, but after calling them, it turned out that it didn’t work on Macs. Boo! & then I found out it was actually a Mayflash joystick, because I saw one exactly the same on another site. So it wasn’t even their own product. I pondered about what I was going to do for a while, and then decided I’d make my own!
I went for an Ultimarc I-Pac 2 interface with USB adaptor. This is the most expensive part of the setup. It converts all the button presses into what the OS sees as a keyboard being used. In fact as I see it, you could also use it to interface other switching devices with your computer too, but it’s intended for gaming really. As these represent a keyboard, they’re virtually compatible with all OSs that can work with a USB keyboard. Now what better a joystick to use than the real ones they use in arcade games? I went for a lush pink ball top Sanwa brand joystick, just like you see on Sega’s popular Megalo and Astro City cabinets. Mmm, nice. & it was only $26. Ooh, now what about them buttons? I went for 8 main buttons, and a 9th button for Start. I also bunged in a different styled black push button from Jaycar for any other unseen purposes. I got OzStick’s $18 wiring pack, which had plenty
of wire for connecting up everything to the I-Pac 2 and a great deal left over as well. The box I used is from an old set of cutlery. I had to get some stand-offs for the I-Pac 2 and some rubber feet for the bottom, so it wouldn’t slide about. Connecting the majority of stuff up didn’t require any soldering, which is great news for those of you who don’t have a soldering iron. It’s also a better way of connecting to the I-Pac 2 using the screws they have, because you won’t overheat the I.C. on it. The extra pushbutton from Jaycar did require wires to be soldered on however, but naturally that was something I did 1st.
As the I-Pac 2 is set up with the likes of MAME in mind, some of the buttons, such as 1, 2 & 4 represent the Ctrl, Alt / Option & Shift keys. This may cause problems with some other games which don’t allow the use of these keystrokes on their own. In Windows, Alt activates the window menu as well. The solution therefore is not to reprogram the I.C., but to simply use some of the 2 player connections instead. As this is a joystick for just me, it doesn’t present any problems.
The joystick required about a 2 cm sized hole and then once that was cut, I lined it up for the bolts at the corners. The wood was too thin to use screws underneath. The buttons required 2.8 cm holes, and I set up the bottom row colours like the Neo-Geo style. They’re quite firm, and you can hear the springs in each one when you press & release them.
So there you have it, my own custom joystick ready for some gaming on my Mac-aroony, or my PC. For those of you who didn’t already know, you can fairly readily buy other arcade game bits and bobs such as coin mechanisms, trackballs and what not.
Click here for another image.
The KGB Spy Cam
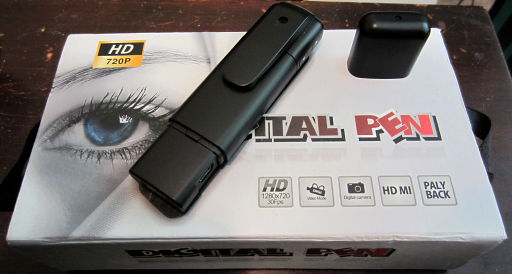  Hee, hee, well this isnt really a secret Russian device it was just called that from the place I got it from. It is in fact just a miniature video camera in the shape of a highlighter. I wanted something inconspicuous that would fit in my pocket, and after an iffy experience with a regular pen shaped camera from Jaycar, I decided to get this one after seeing some videos of it on the Internet. With a little microphone at the upper region of the clip area and the small camera below, you can record both video and take still pictures. The image resolution is 2592 × 1944 pixels and the video resolution is 1280 × 720 pixels with a 29.97 frames per second speed. If you choose a lower video resolution for recording, it will actually jump up to 59.94 f.p.s. The audio is clear without any staticy clicking noises which plague some of these types of cameras, and the image quality is fairly good in the daylight. At night it seems more blurry and rough. Dont expect anything like a high end full size camera. You also need to keep quite still when getting pictures also. Hee, hee, well this isnt really a secret Russian device it was just called that from the place I got it from. It is in fact just a miniature video camera in the shape of a highlighter. I wanted something inconspicuous that would fit in my pocket, and after an iffy experience with a regular pen shaped camera from Jaycar, I decided to get this one after seeing some videos of it on the Internet. With a little microphone at the upper region of the clip area and the small camera below, you can record both video and take still pictures. The image resolution is 2592 × 1944 pixels and the video resolution is 1280 × 720 pixels with a 29.97 frames per second speed. If you choose a lower video resolution for recording, it will actually jump up to 59.94 f.p.s. The audio is clear without any staticy clicking noises which plague some of these types of cameras, and the image quality is fairly good in the daylight. At night it seems more blurry and rough. Dont expect anything like a high end full size camera. You also need to keep quite still when getting pictures also.
By connecting the camera to a TV / capture device with a HDMI connection, you can tweak the settings. (The instructions arent very
clear on the settings either.) Unfortunately there is no other way to connect it to a TV, so if you dont have a telly with a HDMI connection, youre kinda screwed.
Data is stored on a micro SD card which is upgradeable to 32 GB. (Probably due to the limit of the FAT 32 file system.) Battery charging time is around 2 hours, and you get about 1 hour of recording time. You can play the videos and look at the pictures on your TV directly from the camera, although only with a HDMI connection, but you can transfer them to your computer via a USB cable. Pictures are in JPEG format and the videos are in the Apple QuickTime container (MOV) with Ambarella AVC video compression, and MPEG 4 audio compression. (128 kbps, 48 KHz.) So theyre easily playable in QuickTime and VLC. I use MPEG Streamclip to convert the videos for use in VirtualDub. A lot of these pen type cameras have the date & time added to the image, but this one does not, which is what I wanted. It does give a time and date on the files, but its from late 2008. I have no idea if you can change it, but of course you can always just change the file time and date on your computer with something like New File Time.
Obviously the camera was designed for American use, since it only provides NTSC capturing of video, which is a bit of a pain, if you want to convert it to PAL. Dont be confused by the box which says PALY BACK this is just some shocking misprint for playback.
Canon Powershot ELPH 300 HS / IXUS 220 HS digital camera
 The film
based camera Id been using had started to get a bit dodgy with the little release button thing underneath, and it would only let me take a picture if I moved the film along for 2 shots! So that was a rip off. So I decided to look at a new digital camera instead, as I view most pictures on the computer anyway these days. I looked at a Pentax Optio H90 1st in a review, but when I couldnt find any places that stocked Pentax cameras, let alone this one, I decided to read about the Canon ones, and this particular one got quite a lot of good comments by users in response to various reviews. So I read more specific reviews on this one and looked at actual pictures as well. Then I found it at Dick Smith, where I got it for less than the shelf price WITH extras! Such as an extended warranty and a free 4 GB memory card. :-) All up: $190. The film
based camera Id been using had started to get a bit dodgy with the little release button thing underneath, and it would only let me take a picture if I moved the film along for 2 shots! So that was a rip off. So I decided to look at a new digital camera instead, as I view most pictures on the computer anyway these days. I looked at a Pentax Optio H90 1st in a review, but when I couldnt find any places that stocked Pentax cameras, let alone this one, I decided to read about the Canon ones, and this particular one got quite a lot of good comments by users in response to various reviews. So I read more specific reviews on this one and looked at actual pictures as well. Then I found it at Dick Smith, where I got it for less than the shelf price WITH extras! Such as an extended warranty and a free 4 GB memory card. :-) All up: $190.
The maximum resolution is 4000 × 3000 pixels, but you can change aspect ratios. It also records video up to 1920 × 1080 pixels, but only at 24 frames per second. It will record faster on lower resolutions. The video is shown as being avc1 in VLC, and the audio codec is sowt. QuickTime just shows it as H.264. Despite setting it to PAL in the cameras menu, it still comes out as NTSC, which means youd have to convert it manually. There are no PAL resolutions listed at all! But I didnt get it for the video functions. That said though, the image quality for the videos is pretty good; the main
problem is it suffers from what I can only describe as a low scanning speed, meaning that if you record stuff out of a car window for instance, foreground objects tend to bend over and it can sometimes get the wobbles like some other cheapo video cameras Ive seen. So, youd probably want to stick to a proper video camera.
The camera features a manual mode, where you can set your own ISO setting, white balance and other stuff, plus a fully automatic mode, where it does everything for you. Theres a built in flash, which you can choose to have on, off or on automatic as well. Heck, you can even customise the start up picture! You can zoom in with a video recording, although slower, plus it has face / subject detection, AF assist beam for night shots, red eye reduction, wink and smile detection and a whole stack of other stuff I dont even remember. The optional computer software will run on Windows XP, but only with service pack 3. For Mac OS X, you need Leopard or higher, and its only for Intel CPUs. But you can always transfer the images without Canons software. In fact, its a lot faster to use a card
reader, rather than plugging the camera itself into your computer. As usual with a lot of these cameras, theres a bunch of extra junk in the image files, so if you want to trim it out without recompressing, you can use a tool like JPEG & PNG Stripper or jStrip. (Which are both for Windows.) The video files seem to have a bit of extra junk in them too.
The image quality is pretty top notch, and Ive been pretty impressed by the level of detail visible and clarity of the piccies. The size is pretty small, and the camera will easily fit in your pocket, but some fat handed users may find it uncomfortable, especially with all the buttons and stuff on it. The case is made from
metal, as is the tripod fitting. The LCD is fairly clear, and all options are set from the controls on the back at the right hand side. All in all, I would definitely recommend this camera! But if youre more of a professional that needs important controls, like the focus, you should look for a higher end jobbie than this. But for happy holiday snaps and what not, this is a perfect choice. If you head over to my spot at deviantArt, you can see some of the pics Ive taken. (Any of the lighthouse ones are a good example.) In the mean time, check out this other review at Steves Digicams.
Digitech VGA To Composite & S-Video Converter
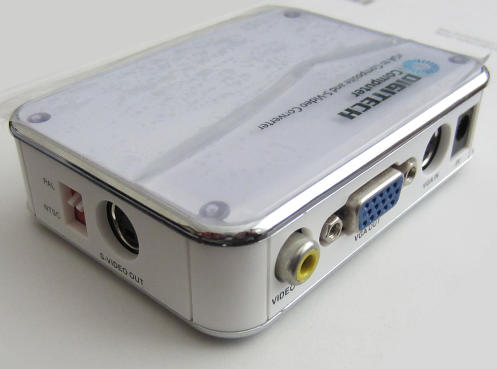  I got this dealie from Jaycar, because unlike a lot of my previous video cards, my new computers video card doesnt have a normal video-out socket. One thing I found with this, is that you can not use a DVI monitor and the VGA connection at the same time. You will just get a weird image through the VGA output in like magenta
and green. On the other side are a bunch of buttons to make tweaks, but theyre a waste of time, because they get forgotten as soon as the power goes off. Some of them cause more problems than they solve as well. In one situation, when I changed some setting, it wouldnt let me change resolutions properly, and even swapped the video fields! Ouch. So its best left on the default settings. The PAL output STINKS by the way. There is no conversion at all for the frame rate. It just drops frames instead. I got this dealie from Jaycar, because unlike a lot of my previous video cards, my new computers video card doesnt have a normal video-out socket. One thing I found with this, is that you can not use a DVI monitor and the VGA connection at the same time. You will just get a weird image through the VGA output in like magenta
and green. On the other side are a bunch of buttons to make tweaks, but theyre a waste of time, because they get forgotten as soon as the power goes off. Some of them cause more problems than they solve as well. In one situation, when I changed some setting, it wouldnt let me change resolutions properly, and even swapped the video fields! Ouch. So its best left on the default settings. The PAL output STINKS by the way. There is no conversion at all for the frame rate. It just drops frames instead.  Youre best to stick with NTSC, and as most modern TVs made since about 1990-ish will support NTSC anyway, you may as well stick with that. (At least with this converter.) I can capture that okay with my Canopus ADVC-110 and convert to PAL with JES De-Interlacer on my MacBook if I wish. As NTSC is actually 59.94 f.p.s., and the VGA output is truly 60 Hz, you do get a bit of tearing on some games, (which looks more like a ripple coming down the screen,) or the occasional frame skip on others, but its not as bad as the PAL output. Sometimes while Ive been capturing, the signal screws up and you lose about a second of video! But you dont see it happen on the TV. Im not sure what is going on there. Youre best to stick with NTSC, and as most modern TVs made since about 1990-ish will support NTSC anyway, you may as well stick with that. (At least with this converter.) I can capture that okay with my Canopus ADVC-110 and convert to PAL with JES De-Interlacer on my MacBook if I wish. As NTSC is actually 59.94 f.p.s., and the VGA output is truly 60 Hz, you do get a bit of tearing on some games, (which looks more like a ripple coming down the screen,) or the occasional frame skip on others, but its not as bad as the PAL output. Sometimes while Ive been capturing, the signal screws up and you lose about a second of video! But you dont see it happen on the TV. Im not sure what is going on there.
The converter uses your USBs power to run, but thats all it needs from your computer. There is no software to install. It just shows up as a generic monitor. The instructions mention nothing about the 2 switches for PAL / NTSC, so if you only change one of them, you might be in trouble. As you can see in the pic, there is a S-Video output on the side, and normal composite video out on the back. Theres also a VGA out socket, in case you want to send the image through to a computer monitor.
You can use
up to 1024 × 768 pixels in terms of resolution, but of course they will all be resized to fit your TV, like most video cards do anyway. The quality is about the same not all that brilliant. My XBOX 360 and Dreamcast are a lot more sharper than this thing. So, I wouldnt recommend it, unless youre desperate. You might want to spend over $400 for something a bit more decent. I also tried a Shinybow converter, which I got from America, but it was worse than this one. Better yet, find yourself a video card that actually has a video output socket. (Or see my Gefen converter below.)
Price: $69.95
Canopus ADVC 110
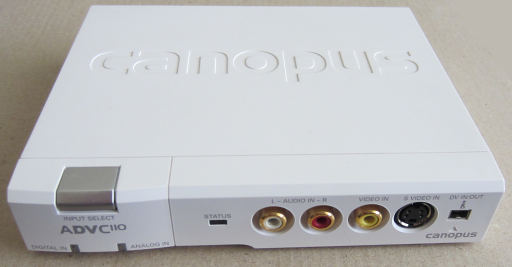 Its about time I had a proper yack about this dealie! The Canopus ADVC 110 is a brilliant analogue video to digital video converter. Actually it can convert both ways, and it does the audio as well. The image quality is superb; crisp and with no colour distortion. Plus it has a synchronisation switch on the bottom, which will ensure your video and audio dont get out of whack. A very reassuring feature! Its about time I had a proper yack about this dealie! The Canopus ADVC 110 is a brilliant analogue video to digital video converter. Actually it can convert both ways, and it does the audio as well. The image quality is superb; crisp and with no colour distortion. Plus it has a synchronisation switch on the bottom, which will ensure your video and audio dont get out of whack. A very reassuring feature!
I use this with iMovie on my MacBook, and its excellent, but as theres no specific computer requirements, you can use this with any OS and software that support a FireWire input for video capture. You could probably use it with Pinnacle Systems Studio software or Adobe Premiere. They do recommend Mac OS X Puma and higher, or Windows 2000 with DirectX 8 & service pack 3 though.
You could also use the converter for a video camera which had no regular outputs, and like a FireWire connection only. Although I doubt many cameras would be like that. And then you could connect it to your TV.
Lower resolution sources, such as Mega
Drive games, or various Saturn titles may cause audio synchronisation issues, regarless of the switch underneath. NTSC or PAL capturing both work equally as good, but it will not support PAL 60 Hz. Videos or DVDs with Macrovision protection will cause the status LED to come on, and you will get a dim display.
If your input is too bright, you may get a bit of flickering. When I use this with my Gefen scaler, I now drop the brightness level on my computer in the nVidia control panel, by 10% to 20%.
Inputs are on the front and outputs are on the back. Pressing the button on the left will choose what input you want; digital or analogue. Sometimes in iMovie, if you have it set wrong, the program will crash.
Keep in mind that this device isnt really suitable for such things as playing console games and ONLY using your computer to view them, as theres a slight delay caused probably by the synchronisation technique. This really is meant for simply capturing video. If you want to use a computer monitor to display a signal from a console, youd be better off getting a composite to VGA / DVI converter. (Or a VGA box if you have a Dreamcast.)
If you shop around, you should be able to pick one of these up for under $300 in America. Expect to pay more in Australia, like about $345. These are made by Grass Valley / Thomson, so they may come under a different name or model now.
Power is taken from your FireWire port, or a suitable power supply, which you will need to buy separately. 6 pin FireWire sockets provide the power, but 4 pin ones do not. Canopus recommend that you do not touch any of the metallic parts of the converter either, as its apparently quite sensitive to static
electricity. During use it does get quite warm, and does have a bit of a smell from inside, but nothing really nasty.
Ive used this to convert entire video cassettes to DVDs with no trouble what-so-ever. Not a frame skipped or any sync issues with sound. All in all, very very recommended! 
Epson Perfection V370 Photo flat-bed scanner
It was time for a new scanner, and this is the one that Id read good reviews about too. I wanted something with a CCD sensor again, and not the CIS type that was on the previous Brother one we used. The thing had a focal range about the length of a gnat, so it was useless for stuff like pens, crystals, your hand and so on. Even bits of paper with bends in them would go totally out of focus in certain regions.
The Epson one has a slide and negative scanning attachment, and extra lighting in the lid, which is great, because Ive been going through my Grandpas slides from 1973, and his self-developed film and putting the images on the computer. It does a pretty good quality job, and you can adjust the colour settings in the previews and see what will happen before you do the main scan as well.
Theres a stand-alone program which you can use to scan, and just save the files, (TIF is there for lossless saving) or you can use the Acquire selection in Photo-Paint too, and have the image come straight into the program. Theres also a program by ArcSoft which comes with the scanner that can stitch images together, and it does a fairly good job. Good for posters and the like, but your scans must be the same size on each one for it to work.
The fully automatic mode is a bit over zealous when it comes to cropping, but you can go into Home mode and adjust it to do minimal cropping, so you know youre going to get the entire image. You can crop manually before you scan, and the software automatically finds the images in slides and negatives for you, which makes things quicker.
On low DPI settings, it is pretty fast, especially compared to the 1st scanner we had back in around 1996-ish. If you crank it up to 4800 DPI, it can be a lot slower, but youll want to be scanning stuff of very high quality for this setting.
When you arent doing negatives or slides, you can store the plastic holder in behind the white doodad
inside, so you dont clutter up your desk, or lose it.
As with pretty much all scanners, dust is a problem. Especially for stuff like slides. You will need to keep the slide clean, the glass in the scanner clean, and the strip in the lid where the light comes through, to avoid excess dots and wiggly things in your pictures.
You can scan up to 6 negative images at once, or 4 regular slides. It will not handle anything bigger than 35 mm film though. Although I think Epson have scanners that will do big film.
So yep, the image quality is great, and if you want a nice light weight, and not overly expensive scanner, then this is a good choice. They will work with Macs ( Mac OS X Leopard & up with the installation CD. The Puma driver from their web site didnt work in Tiger ) and Windows as well. (Probably Windows XP.) You can buy these at Office Works for about $196.
Kramer (Tools) VP-501N VGA to composite and S-Video scan converter.
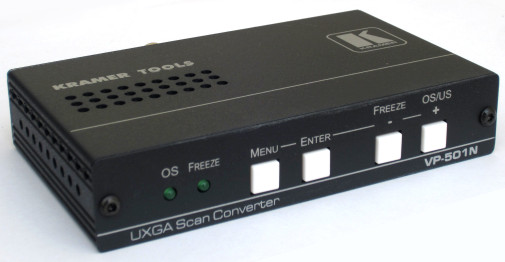 This device is a more expensive version of what the cheapo Digitech thing above does. And it was pretty cr*p in all honesty. Seeing as the purpose of my new computer was to connect it to my TV like a game console, and the fizzing video card has no video out socket, these are the required kinds of devices to convert the output from the VGA socket into a regular composite video signal. Although, you can also use S-Video too. This device is a more expensive version of what the cheapo Digitech thing above does. And it was pretty cr*p in all honesty. Seeing as the purpose of my new computer was to connect it to my TV like a game console, and the fizzing video card has no video out socket, these are the required kinds of devices to convert the output from the VGA socket into a regular composite video signal. Although, you can also use S-Video too.
There are pretty much no reviews of this device out there, so I will try to go into detail about how it works and how good the output is.
The PAL output was once again disappointingly jerky. There was no option to set the refresh rate to 50 Hz on your computer, so of course, the device itself must convert it. And it isnt up to par. Its semi-fine for NTSC, which is almost the same as the 60 Hz output from the computer, but not suitable when youre just dropping frames to achieve the PAL rendition. Prior to getting any of my scan converters, I hadnt seen any sample videos from any of them, so it was very hard to judge what they were going to be like. The image quality on the VP-501N is really good though. You could read the small text in Windows at 1024 × 768 pixels with ease.
If youd read my News Page, you may have already seen me mention a bit about a Shinybow converter too. Well, it was just as bad as the Digitech one, if not more so. And it was supposed to be sold primarily as a NTSC to PAL and PAL to NTSC converter, yet it still had the ugly frame dropping issue. Plus you couldnt adjust the
brightness either.
What you get in the box with the VP-501N, is the actual converter and the power supply. You will need to provide your own VGA cord (more money wasted there) and if youre buying from America, you will need to be aware of the power supply pin difference. (The power supply does handle 240 V and comes with a European set of pins as well.) In any case, I used my transformer for American appliances.
There are 4 memory selections to remember your settings and you can adjust brightness, saturation, contrast and flicker reduction. You can also over scan, under scan, and freeze an image, as well as scaling & centring both the input and output. It will support up to 1600 × 1200 pixels, and can also handle a component video input too. The controls were awkward and time consuming to use as well. Stretching an image did not enlarge it centrally, but from one side, so you had to go and re-centre it every time you wanted to stretch.
As for the price, youll be looking at around $509.60 from America, depending on the exchange rate, and from $755 up to $828 here in Australia. Ouch, what a rip-off!
One of the major problems with the converter though, is that the scaling feature is nowhere near good enough. You could zoom in and over scan the image to way-too-big sizes, but there was no possible way to fit the entire screen image on your TV, no matter what you adjusted. So who tested these things?! Not only that, but the zoom mode had a glitch that caused this to happen.
So it would obviously seem that you would need to spend in the thousands of dollars to get something decent, and really for me, I think I will just have to try and get another video card, because all these consumer level scan converters
are just not worth the money, and Ive chucked over $200 down the drain on them already. This one is going straight back to B & H for a refund. Do not bother with it.
Philips 29PT3323 colour television
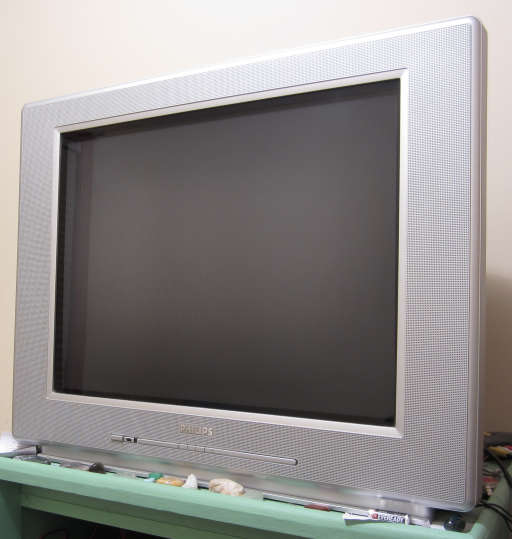 This is my telly! Back in July-ish 1997, I got a 34 cm Panasonic TV when I was still at school. It was pretty brilliant, and fairly easy to move too. Eventually I wanted something a bit closer to the size of arcade monitors, so in 2005 I decided to go for a 68 cm size TV. Unlike the little Panasonic one, this one has stereo audio, which is pretty much standard these days. Plus it has a totally flat CRT. (Well, on the part you view anyway!) This is my telly! Back in July-ish 1997, I got a 34 cm Panasonic TV when I was still at school. It was pretty brilliant, and fairly easy to move too. Eventually I wanted something a bit closer to the size of arcade monitors, so in 2005 I decided to go for a 68 cm size TV. Unlike the little Panasonic one, this one has stereo audio, which is pretty much standard these days. Plus it has a totally flat CRT. (Well, on the part you view anyway!)
As it was only ever intended for my game consoles, I never gave it an antenna to watch anything that was transmitted from the TV stations, and by 2011 or so, Id given up watching anything that was broadcast anyway. I did however connect it to another TV via a long cord to try out the built in teletext decoder though. That was pretty neat, since Id never seen teletext stuff before. It did manage to show a little bit of teletext information from an old video I used to record Robin Hood: Prince Of Thieves, but not much more than the time and date were displayed. Apparently you need more like Super VHS quality to get the teletext information without it being too corrupted.
There are plenty of inputs on this TV 3 sets of regular composite connections, S-Video and component as well, so long as its interlaced. The interlacing on this TV seems quite a lot more noticeable than the little Panasonic one, and often gave the impression it was showing both fields at once, rather than one after the other. Perhaps the phosphor retains the image longer. I dunno. Anyway, the component input is pretty nice quality, with no wobbliness in the pixels, like you get on the composite input, especially around the edges of vibrant magenta and red colours. Unfortunately I havent used it in ages.
|
|
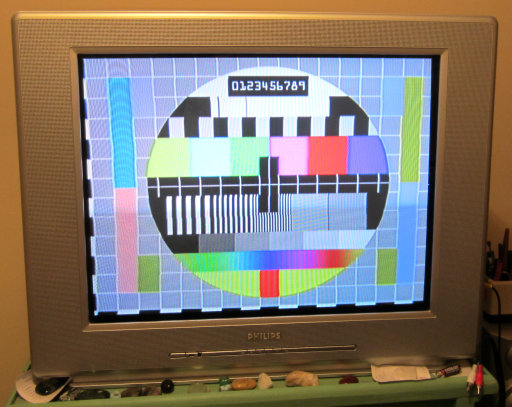
Click to see a test pattern sent from my MacBook. 
|
On the right side is a headphone socket, and there are video and audio outputs as well at the back.
For consoles like my Mega Drive and Atari 2600, for which I only have RF connections, you can choose what channel you want to assign by automatic or manual tuning. The TV will also show the frequency of the signal too.
Having the contrast set too high, I think it was, may cause the colours to change based on the overall brightness of the picture, so you need to keep it lower than about 70%. You can also expand letterbox style video to fill the entire screen, but personally I dont like tampering with the aspect ratio.
You can set personal picture and sound adjustments, plus theres personal zapping to allow you to store your favourite channels too. But seeing as there were only ever 6 channels that you could receive in the pre-digital transmission days, there probably isnt much point to it.
As well as the standard PAL system, the TV can also show NTSC and 60 Hz PAL too. From memory, if you have it set to a channel that doesnt exist, instead of hearing the static sound, it will just remain silent, but you do see the static on the screen.
In terms of weight, this thing is heavy! It comes in at about 44 kg, so you need about 3 people to move it. At least it isnt easy to steal.
Since a couple of years ago, mines developed a bit of a minor, intermittent fault, which Im intending to get fixed. The thing is, it doesnt show up all that often. It will just turn off and then back on again, but fairly rapidly. Like a lot of cathode ray tubes, it will degauss itself when you first turn the TV on. This is useful if youve moved it or changed the orientation in the room. (Because the magnetic field of the Earth can affect it apparently.) The warm up time is probably about 10 seconds, when it hasnt been used in a while, and you get no picture
until it has. You can also tell the difference between a 50 Hz and 60 Hz signal by the vertical size of the on screen display. In 60 Hz, its stretched more.
The remote control is pretty decent, and it has sensible direction buttons to work your way through the menus.
Yep, so its pretty good. The original price was around $500 if I remember correctly.
Gefen (TV) GTV-HDMI-2-COMPSVIDSN HDMI to composite & S-Video scaler / converter.
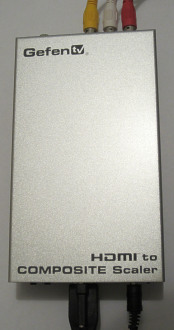 My Gefen HDMI To Composite Scaler has arrived! And about 5 days earlier than I thought too! My Gefen HDMI To Composite Scaler has arrived! And about 5 days earlier than I thought too!
Short of getting an older video card, there wasnt much choice left in doing what I wanted, in terms of getting the video out from my new PC to my TV, and it looks like FINALLY, this Gefen dealie is the answer!
The picture size on the underscan setting is just right! You may lose about 3 pixels off the right side of the screen, but honestly, that isnt a big deal at all. So huzzah for being better than the Kramer converter in that respect. Now about the PAL output: Its actually quite good! A little stuttery here and there, but nowhere near as bad as that Digitech doodad or the Shinybow one I got. In fact with this one, I would recommend ignoring the NTSC mode all together, as it wasnt a great deal better, and you get an extra 96 vertical pixels with PAL anyhow. As for Virtua Fighter 5, it was equally as sensational! (The 2007+ models of XBOX 360s seem to have the HDMI socket, so I was in luck.)
If you want things to be ultra smooth though, you can set Windows to run in 720 × 576 pixels at 50 Hz natively with the scaler. Programs seem to work fine with it too, such as Oblivion, MAME and 3D Mark. This is the setting Ill be sticking to now, after I saw how much nicer it is. And as this is the visible TV resolution anyway, its the ideal choice. I found that with some stuff, MAME included, you will need to disable the V-sync setting for your video card, (in my case, in the nVidia Control Panel,) because I encountered audio stuttering. Obviously some applications want to run at 60 Hz or higher and dont like to have to run at a lower frame rate. The trade off though is some minor tearing, but if you can tolerate that, youll benefit from perfect sound and pretty smooth animation. 3D Mark though, will run fine at 50 Hz, at least the version I quickly tested.
As for the the XBOX 360, you need to set it to just plain stereo out, or you will get a buzzing noise, because the Gefen converter wont support the Dolby output, or whatever it was. Also, in terms of V.F. 5, it seemed to set itself into 50 Hz and run the game anyway, so I dunno why it forced the 60 Hz option on you through the regular composite output.
Unless it changed to 60 Hz at start up, and the converter just output it as 50 Hz, which was probably more likely. But anyway, it worked! And it was pretty smooth too. Also, I had to put the display mode to 640 × 480 pixels and then all was good, as the screen didnt seem to be scaled down vertically to match the aspect ratio like it was supposed to have done. Anyhoo, check out these Virtua Fighter 5 screen shots I got with the scaler.
With my new PC, I had some issues using the standard 640 × 480 pixel mode; it gave a picture, but it was squished up horizontally. I found one solution to the problem in getting my video card to run at 1600 × 1200 pixels, and then scale the lower resolution image up. It works in the nVidia Control Panel. I dunno if ATI / AMD video cards have the same setting though. Its basically a choice to let your GPU resize images to your native resolution, rather than what it thinks is the monitor doing it. My Power Mac G5 on the other hand, gave no troubles running in the 640 × 480 pixel mode.
Mmm, and since I dont have anything that can capture PAL at 60 Hz properly, this seems to have become the alternative that Ive long been looking for in terms of V.F. 5! And I got to keep the 4:3 aspect ratio, so I didnt have big black borders. HDMI is a bit of a c**t with the 4:3 aspect in higher resolutions it would seem.
Or the XBOX 360 is anyway. As for the computer use, that was fine, and you got the resolutions it said it would support. (Up to 1600 × 1200 pixels, as well as 1920 × 1080 pixels.) Using it with my DVI connection on my monitor, you could have both running at once, but the TV became primary. I set the refresh rate to 60 Hz, because it was set to 75 Hz, and at 1st I thought that was giving it troubles, but maybe not. I played some Seinfeld and that seemed pretty smooth and watchable. So yay for that!
The Gefen scaler doesnt support HDCP though, so keep that in mind. But I think only movies really use that.
The scaler also has 2 audio output sockets, because the HDMI tranfers audio as well as video. In terms of using it with my new PC, Windows seemed to detect the scaler as an audio output device, even though it was plugged into my video card. In any case, you could reset the SoundBlaster Audigy to the default sound device, and still get audio out of it instead, because there was no audio out otherwise. (Of course with the XBOX 360, you just use the audio which comes through from the HDMI connection.)
 The image quality is great as well, just like the Kramer scan converter, and its certainly better than my nVidia GeForce 7600 GT. If youve seen some video cards TV outputs in the past, and thought they were a bit blurry, well this is way better than that. There doesnt appear to be any strange delays in the picture either; it all comes through in real-time. If youd like to see a sample of this connected directly to my Canopus ADVC-110, you can view it here. I personally feel that youre not going to get much better quality than this for a composite connection. This has only been compressed once, to DV quality video, and reduced to 16 bit colour for the sample image, but you can still see how sharp it is. Theres some minor colour distortion there, but it rivals just about every game console I have, and definitely out-does any other video card / adaptors for my computers. The image quality is great as well, just like the Kramer scan converter, and its certainly better than my nVidia GeForce 7600 GT. If youve seen some video cards TV outputs in the past, and thought they were a bit blurry, well this is way better than that. There doesnt appear to be any strange delays in the picture either; it all comes through in real-time. If youd like to see a sample of this connected directly to my Canopus ADVC-110, you can view it here. I personally feel that youre not going to get much better quality than this for a composite connection. This has only been compressed once, to DV quality video, and reduced to 16 bit colour for the sample image, but you can still see how sharp it is. Theres some minor colour distortion there, but it rivals just about every game console I have, and definitely out-does any other video card / adaptors for my computers.
The power supply accepts 100 to 240 V, and actually came with an Aussie set of pins! Hooray! Except they were 90° out of whack like that kooky one I got for a portable hard drive. Anyway, Im using an extension cord rather than plugging directly into my power board, so it isnt a big deal. There were also American, British and possibly a European set of pins in the bag as well.
As far as the price goes, youll be looking at around $270 from America, $502.20 from England, and $459 from Australia. So, I think I can safely say at last that this is my recommended choice. And being able to use it with my XBOX 360 to capture stuff from V.F. 5 is like a nice little 2-in-1 bonus.
Apple Mini DVI To Video Adaptor
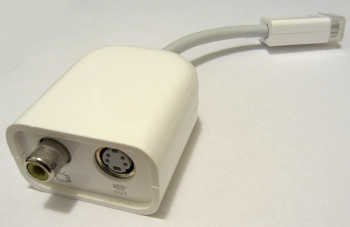 Heres another handy video related gadget! This is for my MacBook, and it allows you to use the mini DVI socket to connect into your television by either composite or S-Video. Mac OS X will detect it as another display, but with settings for a TV, such as whether you want PAL or NTSC, and over scan or normal modes. You can also set which monitor is primary, or have a duplicate image, like you can do in Windows as well. The output quality is fairly good, and probably a bit sharper than most video cards. I did notice a bit of jerkiness in playing DVDs, even with the frame rate being the same. Heres another handy video related gadget! This is for my MacBook, and it allows you to use the mini DVI socket to connect into your television by either composite or S-Video. Mac OS X will detect it as another display, but with settings for a TV, such as whether you want PAL or NTSC, and over scan or normal modes. You can also set which monitor is primary, or have a duplicate image, like you can do in Windows as well. The output quality is fairly good, and probably a bit sharper than most video cards. I did notice a bit of jerkiness in playing DVDs, even with the frame rate being the same.
The plug is a bit tight in the mini DVI socket, so you need to be firm, but not too rough
with it.
You can pick these up for about $30 now.
Audio-Technica ATH-ANC9 Active Noise-Cancelling Headphones
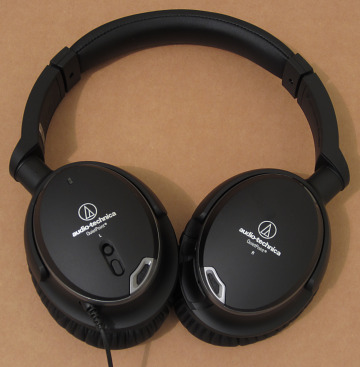  I got these headphones to try and help me sleep better, if I woke up before I should. That was the primary intention. They do work to some extent, but unfortunately, the sounds annoying me still got through, which is probably a disappointing issue with all noise-cancelling headphones on the whole, it would seem. Anyhow, these require 1 AAA size battery for use, and it slides into the right hand side speaker area. One of these should last up to 35 hours. Rechargeable ones may be less. There are 3 modes of use, AirPlane, Office & Study. Office being the best for me. At one stage, when I walked out into the kitchen, the sound from the fridge was cancelled entirely. I didnt even realise it was making any noise until I took the headphones off. Closer noises can be more noticeable though. You can usually test noise cancelling headphones in shops, like JB Hi-Fi, so make sure you get an idea of what theyre like, like I did, before you buy any. I got these headphones to try and help me sleep better, if I woke up before I should. That was the primary intention. They do work to some extent, but unfortunately, the sounds annoying me still got through, which is probably a disappointing issue with all noise-cancelling headphones on the whole, it would seem. Anyhow, these require 1 AAA size battery for use, and it slides into the right hand side speaker area. One of these should last up to 35 hours. Rechargeable ones may be less. There are 3 modes of use, AirPlane, Office & Study. Office being the best for me. At one stage, when I walked out into the kitchen, the sound from the fridge was cancelled entirely. I didnt even realise it was making any noise until I took the headphones off. Closer noises can be more noticeable though. You can usually test noise cancelling headphones in shops, like JB Hi-Fi, so make sure you get an idea of what theyre like, like I did, before you buy any.
If you have a compatible PMP, you can use the 4 connection plug to make use of the little button and microphone which is one on of the included cords. As for me, Im just using the regular 3.5 mm male phono plug to the same-plug-on-the-other-end cord. This is one handy feature if you only want the noise cancelling, and nothing else. As for how they sound with music, they are noticeably bass-y, especially after using little bud type ones for years. Even my little Sennheiser ones which I thought had quite a lot more bass, sound significantly different to these.
The power switch is easy to get on, but quite tight to turn off again. The mode changing button is more sensitive and theres what appears to be a RGB L.E.D. to tell you what mode youre on.
As you can tell in the picture, the speakers rotate for storage. There are also 4 microphones in total to give a more accurate noise reduction. If youre in a quiet area, all you can hear is like a static-y sound. But a bit more like rain. You should be aware of this if youre listening to music. For those of you who already have soundproofed studios and theatres, these headphones may actually introduce more noise in these situations.
Youll want to make sure these sit well forward on the top of your head as well, as they can feel a bit heavy, and like theyre going to slide off. Without the battery, they weigh 220 g. As I said, Ive only used little in-ear headphones for ages, so going back to this type makes the weight stand out.
Youll be looking at $229 for these, and I got mine from MiniDisc Australia.
UPDATE 1: I had to send
these back after they developed a strange tapping noise in the right speaker. Im currently waiting for a new pair to come back.
I got a replacement pair, and so far, theyre working better. The switch isnt as stiff either.
UPDATE 2: The 2nd pair have screwed up now too. (It only took 6 days!) They had an almost identical fault, with more of a crackling noise. It came up so loud in the right speaker, that it woke me up! These have now gone back to be exchanged for something else. (PSB M4U 2 headphones, which I shall also talk about.) So yeah, I no longer have these, and thats quite sad, because I did really like them when they were working fine. Gets a mediocre star because of the noise issue. (And this noise was present both with and without them being plugged in, since you can use them on their own.)
PSB Speakers M4U 2 Active Noise Cancelling Headphones.
 I got these as a replacement for the ones above. PSB are a Canadian speaker company, and these are their first line of headphones. PSB dont mention their noise cancelling level, but youre looking at about 18 dB from what Ive read in someones test. The sound quality is good, but dont let the over hyped reviews out there make you think youll be going WOW! when you put them on. They dont seem to sound much better than my $60 Sennheiser headphones. As for sounding like big speakers, well they dont really. Youre totally aware that youre wearing
them on your head. I got these as a replacement for the ones above. PSB are a Canadian speaker company, and these are their first line of headphones. PSB dont mention their noise cancelling level, but youre looking at about 18 dB from what Ive read in someones test. The sound quality is good, but dont let the over hyped reviews out there make you think youll be going WOW! when you put them on. They dont seem to sound much better than my $60 Sennheiser headphones. As for sounding like big speakers, well they dont really. Youre totally aware that youre wearing
them on your head.
With my S9, they sound the best, but on my Sharp audio system, they seem to develop a LOT of static, which is disappointing, because that never happened with my Audio Technica ones or any other non-noise cancelling headphones. So Ill test what theyre like at some stage, directly connected to my sound card.
UPDATE: Yeah, MUCH quieter with the direct connection to my sound card.
Unlike the A.T. headphones, the PSB ones take 2 AAA batteries. You lift up the left speaker cover with something like a screwdriver, and the cover flips up, and can be fully removed. Then it just clips back on.
Once the battery level starts to get a bit low, the LED in the switch will be yellow, which gives you about 4 hours more use before theyre completely dead. (With normal batteries. With rechargeable ones, youre looking at more like 1 hour at the most.) However, if you turn the headphones on in this state, you will get a raucous stuttering sound, like dut-dut-dut-dut-dut-dut-dut-dut-dut, really rapidly. Make sure you turn them off if this happens, and replace the batteries. If the juice runs out WHILE you have them on, the sound / music will fade away into a static sounding distortion.
Some people said they weigh quite a bit, but I didnt find them to be cripplingly heavy. I guess after my regular Sennheiser ones they are a bit more weighty. You do need to open up the size adjustment pretty far the Canadians must have small heads or something. PSB also make a model with no electronic noise cancelling, the M4U 1, so be aware before you buy any old thing! The price is less than Boses QC 25 model, and the noise cancelling is probably around the same. Personally, if it hadnt been for the extra sound effects of my Audio Technica headphones, Idve stuck with them over these. I think they were a little better, and not as noisy on the noise cancelling static sound. And like the A.T. ones, and probably all the rest, you dont HAVE to have music playing. You can just use them
on their own to cut down the noise around you, if youre like at work in the office, or on the train or whatever. Plus you can remove the cord then too.
You get replacement ear pads with the PSB headphones, plus a choice of cords. If you have a mobile phone, (heaven spare us) you can use the optional one which has a microphone built in. You also have the choice of plugging the cord into the left or right side. Dunno what would happen if you plugged 2 things in at once. Heh heh dont go trying that!
Like the A.T. headphones, these apparently have quadruple microphones also, to give better noise cancelling performance from 2 places on each side.
The power switch is much easier to move than the one on the A.T. headphones, and it has 3 positions: Off, on with amplification, and on with noise cancelling too. As for the 2 on modes, expect plenty more amplification. I can run my S9 and computer on much lower volume levels with these headphones.
As far as prices are concerned, youre looking at $369 from MiniDisc Australia, $417.10-ish from England & about $301.60 from Canada. (The exchange rate is almost identical now.) Theyre available in black, white and a very attractive red as well.
Be aware that on this current design, the plastic on the head band will crack, until PSB can come up with a better plastic or implementing a new way of making them flex. I had to get a replacement pair because of this. Opening up the adjustment parts on each side only makes things worse, because the speakers close in together even further, which increases the amount of stress on the top plastic.
Im onto my 3rd pair now, after the 2nd ones had uneven noise cancelling. Luckily I got superb service from QualiFi, the Australian distributor.
Because of the poorly made construction of these, Im going to say dont bother. The head band will end up cracking eventually, and youll be lucky to get 1½ years out of them at best. They may sound good, but if they just fall off your head, theres no point. Plus for that much money, you should expect something a lot better. Mine are now held together with a piece of brass for the time being.
These died when I was attempting to add more metal to hold them together.
Cowon
X9
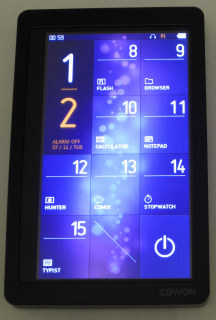 See my additional instructions! See my additional instructions!
When my Cowon S9s headphones socket died, I needed some kind of solution to that. I considered BlueTooth headphones, and may have gone on that route if I was more sure about the delay issue that affects pretty much all BlueTooth related stuff. The other option was another PMP. Sadly, Cowon no longer make the excellent S9, and the closest thing to it, is the X9. I was initially disappointed (and still am) by the GUI, LCD and type of touch screen on this, and sent it back for a refund, from the excellent MiniDisc Australia. It was certainly no reflection on their superb customer service.
I spent more days trying to find another alternative, but saw nothing remotely in the same league. I did take a shining to the Samsung YP-P3, which is quite similar in what it can do, to the S9, and with an even better looking GUI. Samsung have given this player the finger as well, unfortunately. Grudgingly, I decided to get the X9 again, although through Amazon, and in white with 32 GB of storage space this time, instead of 16, since you get short changed in that department, like flash memory units and hard drives. In the 32 GB rendition, you get 30.7 GB of real space, which is better than a supposed 32 GB flash memory unit I got once.
Im going to be honest, and say that compared to the S9, this is a disappointing slide downwards from Cowon. No L.E.D. display, resistive touch screen, which is erratic and requires quite a firm touch, (or better yet a stylus,) and an interface that looks like they designed it with only 15 minutes to spare. The Typist function actually has some irritating glitches, which seems to have been over-looked. If you change to entering numbers, theres no way back to the letters! There is also no way to use the capital letters either. The S9 did not have this problem.
The positive features though, are the same kind of file support as the S9, a larger screen, even though its the same 272 × 480 pixel resolution, and a battery life of 110 hours, which if true, pretty much wizzes all over any other player out there. (Cowon claim a 600 hour standby time as well, if you dont want to turn it right off.) The only thing I found, is that on initial charging, it never says when the battery is full. (On my 2nd X9, it did say it was done on the 1st charge up.)
Start up time is a few seconds at the most, not including the time you have to hold the power button for.
The hold feature on this is really bizarre, especially with music. If you let the display turn off by not touching anything for the amount of time you have set, nothing will turn it back on, except for the power button, and its like this whether you have it set to hold mode or not! Changing the volume and tracks happens
invisibly without the display coming back on. With the S9, a press of anything turns the display back on. Then again, it has a sliding switch for the power button.
When you first watch videos, there is an annoying scan the player does of your files, to show preview images in a section you may or may not even use. And after you pause a video, and want to return to the file listing, you have to press the listing symbol twice to do so, to skip over the image preview thing, which can be a real pain. If you dont let it finish faffing about with the preview image making though, it can end up at a non-relevant location, when you go back to your file listing. Nowhere near the video you were just watching. This is notorious at happening as well, when you add and remove videos from the player. It can be a wise idea to completely delete the Video DB directory, and let the player rebuild it if youve changed your video line up. You will have to wait while it makes the previews, but it should only happen once up until you change your video line-up again.
Like the S9, you just copy your files over to the appropriate directories, and they should play, so long as you follow the limitations of the hardware. So, nothing higher than High level Monkeys Audio compression, and no insanely huge videos.
One advantage over the S9, is the micro SD card slot, which allows you to add more storage space. And of course, change your file line up when you want to, by swapping whatever ones you have. This will show up as an extra removable drive when you plug the X9 into your computer. So you could probably even use it like a card reader, if you dont have a dedicated one.
Like the S9, you must eject this in Mac OS X or you run the high risk of corrupting the file system. The instructions for both players mention this. Windows doesnt seem to cripple it in this way for whatever reason. So for the sake of charging the battery, you may be better to use a dedicated (and regulated) PSU with a USB socket.
The 1 & 2 numbers on the main screen represent the 2 screen pages. Not everything will fit otherwise. You can once again run simple Macromedia / Adobe Flash animations, and utilities. I expect that anything for the S9 will work on this as well. You can also make your own GUI for it with UCI files, which I know very little about.
All in all, I would recommend that you consider this player a good deal before you decide to get fickle, like me. A lot of you will no doubt buy iPods from Apple, but remember that these do not have a wide range of audio formats supported, theyre tied into iTunes, (or other 3rd party programs,) have no MSC transfer mode, and apparently questionable audio quality compared to what Cowon is offering. Ive never used one though to confirm that claim. On the other hand, the X9 feels rushed, and is not impressive, especially when youve had the S9 prior to it, like I did.
Im also not a Google fan by any means, so if you want to avoid the Android OS, this player does not have that on it. Im not sure if you would say it has a proper OS on this at all. I think the ASIC in it runs the Flash interface natively, as well as the supported file types.
16th of May 2024 update! This player is now completely dead. I tried turning it on, and nothing happened. I tried recharging the battery nothing showed on the LCD. I tried it on my iMac G5 no drives listed. Something has snuffed it internally. Its not even 7 years old yet. What a bummer.
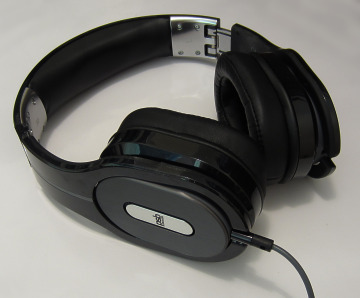
Sennheiser PXC 480 noise cancelling headphones
(Sometime around the 19th of June, 2018.)
 (The picture shows these with my replacement cord and replacement ear pads.) (The picture shows these with my replacement cord and replacement ear pads.)
These are my 3rd brand of noise cancelling headphones, and my 6th pair of such a type in about 3 years & 3 days! (I also had to get my regular non-noise-bustin Sennhesier ones replaced under warranty too!) I hope that doesnt shatter your hopes! After 2 pairs of Audio-Technica headphones failed electronically, 1 pair of PSB Speakers headphones had uneven noise cancelling and 2 pairs had cracked head-bands, Im now onto these. Generally a decent pair of noise cancelling headphones are expensive, so you do want them to last a long while!
Active types of these headphones work by inverting the incoming audio waveforms, so that it cancels itself out. Good pairs will usually have 2 microphones on each side to provide a more accurate cancellation. Usually you will hear a soft static like noise, but these ones arent really that noticeable. Sitting by my computer, I can just hear the fan running, which is currently at 3309 RPM. If you press just a little bit on the sides of the headphones to make them tighter, the noise almost completely goes away. The first time I tried noise cancelling headphones @ JB Hi-Fi, I described it as like my ears going into another quiter room, while you still stood there. If youve never used a pair, thats kind of what its like.
How do they compare to ear plugs? I hear you asking. (Or perhaps I cant hear you! ) Well, a good pair of ear plugs will block out more noise usually. Especially higher frequencies. & yes you can wear ear plugs in combination with the headphones. They dont need to know how deaf you are.
Unlike the PSB Speakers M4U2 headphones, these ones dont buzz when you plug them in, if theyre turned on first. The PSB ones would make a buzzing noise if you even touched the plug with your fingers, and you could even hear flickering lights and other stuff interfering with them. It wasnt bad, but they seemed very sensitive to possibly magnetic fields or something.
This model does not have any BlueTooth connecting ability. If youre one
of those people whos nuts about everything being cordless, these are not for you. But Sennheiser do make other models which feature it. But keep in mind it uses more juice. And on top of that, you actually need a device which supports it. In my place, only my Cowon S9 has this. I dont know if it would work with my Macs in this manner either. My main PC certainly has no BlueTooth feature, or any of my other audio systems. I dunno if it even existed when some of them were made anyhow. Plus, because of the low speed data rate, audio is compressed on transfer, AND you may suffer with delays as well. Some computers may need extra software to transfer audio in this fashion too; its not really something I know much about.
I am a bit concerned that the speaker balance is a little bit out on these too, with the right side speaker being predominately louder. Sounds of course should normally seem to be in the centre of your brain if the speakers are at equal volume levels. This is easier to adjust on my computer, but my X9 does have a way of changing the balance too in the settings.
One thing youre not overly aware of with these headphones, is when theyre turned on. The Audio-Technica and PSB ones had L.E.D.s glowing at all times. These ones have a very small strip of 5 of them underneath, which only come on when you use the switch. They go off again pretty quickly and then stay off.
One of the annoying aspects is the cord, which has 2 problems. Firstly, the stupid 4 part plug. Usually headphones plugs have a 3.5 mm stereo phono plug, which has 3 connections. This one has 4, because heaven forbid that they dont accomodate to all the iPod & Android using sheep, and dont stick to a standardised plug thats used on everything else. The end result is that certain sockets cause drop-outs if the correct one of these plug rings doesnt connect properly. The 2nd issue, is the switch, up near your ear. This has some kind of function for the previously mentioned, fizzing devices I dont even have, but in fact connects the 2 parts of the plug together. So, what I did, was tape it down with sticky tape, so the button is always pressed. The sodding thing also keeps snagging on my clothes and on the desk as well, which makes it a real nuisance. Its not something you would expect on such an expensive pair of headphones really. PSB did this better and provided 2 cords.
The battery charge time is supposed to be about 50 hours I think, and the 5 L.E.D.s on the right speaker represent 10 hours of charge each. What is also odd, is the choice to use a USB connection to recharge the internal battery. Something which headphones are not related to. So, you actually need to provide your own power supply at extra cost. Thats right, there is no included charger! But it does have the cord, which has some kind of customised looking plug on one end.
Compared with the PSB headphones, these are also much lighter, which is better on your neck.
These cost $303.15 from Britain through Amazon, but exchange rates may alter that price.
22nd of November 2020 Update: Almost 2½ years later, & the cord on this is really banged up. Slices and bits falling off all over the place. Whatever the substance is that coats the cord, its some kind of soft, dark green rubbery looking stuff. With daily use for that period of time, its really worn, and now covered by probably 40 cm worth of packing & sticky tape. So for $26, Ive ordered a compatible, unofficial replacement cord from eBay. (Which doesnt seem to have that bl**dy annoying switch!) Hopefully itll last longer. I need some replacement ear pads for them too, cos these ones are peeling & tearing. Ive had to stitch the rips up about 4 or 5 times. So there you are, if youre thinking of getting these headphones and using them on a regular basis, these are the issues youll be facing, unless youre the kind of person who replaces their headphones every year and doesnt mind blowing over $300 a time.
4th of May 2022: I ordered some replacement ear pads last night for these. (For about $17.) Unlike PSB, who give you a free replacement pair, Sennheiser dont. Anyway, mine really peeled and have started tearing apart. The stitches and sticky tape just arent keeping them together any longer! So yeah, if you get more than about 4 years out of the original pads, Id be surprised. Especially if you use them daily.
13th of May 2022: My ear pads turned up today, and I would say that they definitely cut more noise out than knackered ones, where you could see the interior foam.  Getting them on is a bit of an effort, and you should be patient and careful. Getting them on is a bit of an effort, and you should be patient and careful.
13th of June, 2022: Dang. One month after I got the new ear pads, and this morning I woke up to a ringing kind of feedback noise in the right speaker. This never happened before with these, so perhaps their time is up. I was really hoping & praying to get 10 years out of them at least. I figured the head band would die 1st. There are still a few people selling this model on eBay, but theyre not much cheaper than 4 years ago. That said, at least they still function in the off setting of the switch. So theyre still usable as non-noise cancelling headphones. Last night they seemed to be working great too. Ill see what happens tonight and mention the results here.
26th of November, 2022: The brooooo! kind of noise happened again, but only while Ive been in bed. It may be related to something being too close to the outer microphone.
Sharp EL-6073 Memo Master 100
 I got this pocket sized electronic organiser back in about 1993. In fact I have the EL-6072 version as well, but this one has some new features. With 1888 bytes of memory, it sounds like sod all, but you can fit quite a few phone numbers, names & appointments in here. There are 3 main modes: Telephone, Schedule & Calculator. You can also use the numbers stored in the telephone mode as constants for calculations. Stuff like metric conversions, pi & even approximate currency conversions as suggested by the instructions. I got this pocket sized electronic organiser back in about 1993. In fact I have the EL-6072 version as well, but this one has some new features. With 1888 bytes of memory, it sounds like sod all, but you can fit quite a few phone numbers, names & appointments in here. There are 3 main modes: Telephone, Schedule & Calculator. You can also use the numbers stored in the telephone mode as constants for calculations. Stuff like metric conversions, pi & even approximate currency conversions as suggested by the instructions.
The required battery is a 3 volt CR-2016 button type, and replacing it will pretty much guarantee that the memory is corrupted. So keep that in mind! Another thing thats of note about both of these organisers, is that their LCDs seem to get damaged. Whether this is something to do with the jolt of putting in a new, fully charged battery, or what, I dunno. Some of the segments now no longer come on fully, which makes the 7 segment numbers on the bottom row more difficult to determine.
In case you have one, and dont have the instructions, the reset method, is to press the reset button on the back, and then press SHIFT. Release it & then press ENTER. It should then tell you the reset was successful.
Unlike the EL-6072 model, this one now has a fax and remark feature as well. Plus there are 2 telephone sections, which Im not sure if the other one had. (Telephone 1 & 2.) You could put business numbers in one perhaps, and personal ones in the other.
Entering letters requires you to press each button up to 3 times to get the letter you want, and if you want the same letter again, you need to press the CM button, which acts as a forward movement. Pressing ÷ acts as the numerical change function, so you can enter numbers into the top line. There are also 8 symbols, which are $, ¥,  , :, (, ), #, and *. You can also use full stops and spaces. The calculator will accept up to 12 digits, which is rather good, and the instructions mention some techniques for more advanced calculations too. For instance: (4³)². You just press 4 × = = × = & you get 4096. , :, (, ), #, and *. You can also use full stops and spaces. The calculator will accept up to 12 digits, which is rather good, and the instructions mention some techniques for more advanced calculations too. For instance: (4³)². You just press 4 × = = × = & you get 4096.
|
|
|
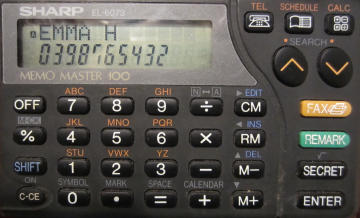
This is the telephone mode. |
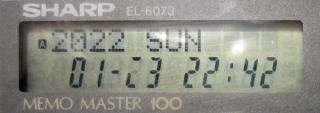
The dates are in the American style with the month 1st, instead of the day. No Y2K bug bull$#!+ here either. The year is shown as a full 4 digits.  |
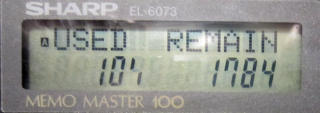
Checking on used bytes and remaining ones. |
In these sample pictures, you can see where various segments of the LCD have nigh on snuffed it. I guess its age has caught up with it.
I remember having girls phone numbers stored in one of the organisers back in high school. Theres one I almost wish I could give a jingle to now, and pop over for a bit of romance.
Theres no computer interface for this organiser, but more complex ones of the time did have such features. No USB of course. It didnt exist then.
I dunno if Id buy one of these again these days especially with the LCD conking out issue. They were only $29.95 back in the day from Dick Smith, but I couldnt say if their values gone up or down. If youre into collecting this kind of thing, you might be interested, but I think for most people, there are probably better options these days. (Besides freakin mobile phones.)
UPDATE! A few days later (on the 26th of January) & the LCD is working fine again with no missing segments / dots. *Shrug.* So who knows?
Yeah, and then it stuffed up again later. There might actually be a break somewhere in this organiser & the other one I have.
JVC Nivico 8204R Portable Radio
 This was my Nannas kitchen table radio. She used to use it all the time, and it still works fine. Im putting this on my site here, because its a model I havent seen any mention of on the web. This was my Nannas kitchen table radio. She used to use it all the time, and it still works fine. Im putting this on my site here, because its a model I havent seen any mention of on the web.
As its a portable radio, you obviously need batteries to run this, and it uses 3 C size ones, making it 4.5 V. You can also use the built in transformer to power it, and theres a cord with quite a small plug for this model. The radio has FM, MW (or AM) and SW bands, and its antenna is quite long when fully extended. The lower part you can see in the picture is a cover, which is detachable by pulling out a knob thing on the back. It has strap holders on it, if you want to carry it. On the left side, are 4 3.5 mm size sockets. The top one is marked as FMMPX, and according to the instructions, it allows you to listen to FM broadcasts in stereo, with an adaptor. Somewhere in the house ( although goodness only knows where ) I have an adaptor for planes, and I think it may fit this, but Im not sure. But it also says IN & OUT on the case. So that seems weird. The lower sockets are marked as EAR & REC. This is obviously for an earphone, and the record one is to connect a cassette recorder, so you can record stuff off the radio.
On the top, is a sliding style volume potentiometer control, band switch and 9 position tone switch as well. (Thats the creative sound part of it.) The red button on the front allows the tuning area to be lit from the right hand side by a small light bulb. The AFC switch can be turned to ON for drift-free FM listening, as the instructions say. The tuning meter, also indicates when the batteries are running low. If its in the red, tuning is at its optimal setting. Although this also indicates that the batteries are running low, so you had better exchange the batteries as the instructions demand! You can almost imagine somebody wagging their finger at you while they say it. So its kind of weird that they would use the one meter for 2 purposes.
There isnt much else to it really. The instructions mention that it has 14 transistors, and as youd expect these days, its a superheterodyne style circuit. The short wave band covers 6 MHz to 18 MHz, and it has a power output of 1.3 watts. The radio was made in Japan, and it looks like somebody whose English wasnt the best, did the instructions as well, as its very quirkily written. Instead of saying: Do not use near a heater, they have do not dispose near a heater, like you were going to chuck it out or something. And in case youve never seen a radio in your life: When tuning the set, watch the Tuning Indicator and rotate the tuning knob. Struth hey? I wondered what it did. The instructions also say it will work on 110 V, but the back of the actual case only says 220 V. Lets hope its a bit flexible, because the power supply can go up to 250 V in Australia. It would be interesting to see if it did function at the lower 110 V level though. If anybody knows the year of manufacture, please do write in & let me know. I would say from the 1970s, probably.
Theres now a page about this radio, at the Radio Museum site, with pictures I donated, and some further information.
Sport De Paco Rabanne Radio
 Heres something a little unusual. This was a bonus radio that you received if you bought some Sport De Paco Rabanne fragrance / aftershave. As I was only a kid at the time, my Dad ended up buying it, and I scored the radio. Now I did a search for this brand, and the radio on the web, and found nothing at all, but pictures of fragrance bottles. So I dont know how rare it is. Id be surprised if a fragrance company knew how to design a radio circuit, so they probably had somebody else do it for them. It says Made In China on the back. No surprises there. Heres something a little unusual. This was a bonus radio that you received if you bought some Sport De Paco Rabanne fragrance / aftershave. As I was only a kid at the time, my Dad ended up buying it, and I scored the radio. Now I did a search for this brand, and the radio on the web, and found nothing at all, but pictures of fragrance bottles. So I dont know how rare it is. Id be surprised if a fragrance company knew how to design a radio circuit, so they probably had somebody else do it for them. It says Made In China on the back. No surprises there.
Whats interesting, is that there are 2 tuning knobs. One for AM, and one for FM. You usually have a shared knob. So you could keep it on your favourite station on FM, for instance, and then change to another station on AM, without losing your spot, FM wise. Although its very vague about the frequency youre on. Theres a sliding switch to change the bands, and a combination volume and power knob on the opposite side. The radio takes 4 AA size batteries, meaning it runs on 6 V. I tried some slightly used ones, and heard nothing out of it. So maybe it died.
There are 4 lumps on the bottom for feet, so the orientation in the picture is how it was meant to sit on your table / bench. Of course with the carry strap, you could hang it round your neck and have it going while you were out and about.
As for a year, uh
somewhere in the late 1980s to early 1990s. It was from some store at Bondi Junction. Probably David Jones. If you know who made this radio, or have any other information, write on in and let me know.
Update! I fixed it. The power switch was grubby. After a bit of metho and scraping with the letter opener, it was working again. A bit crackly though. If anybody wants to see the inside, I took a photo of that too, so let me know. The speakers just a ¼ watt 8 Ω jobbie, and it looks like they made a few mistakes with the wiring, because there are a few bits chopped here and there. Plus a little 1/8 watt looking resistor on the solder side of the PCB, almost does itself out of a job, by nearly short circuiting itself with its own lead.
Trakton TR-287MFS Mini Stereo Radio Cassette Recorder
 Heres another piece of audio equipment that seems to be unmentioned on the web. From my web search, I did find other Trakton gizmos related to Australia, but this was made in Taiwan. It mightve been a cheapo brand cassette player back in the day. It was certainly cheap for me I got it for free! Whod have thought that even back in my primary school days Id have gone dumpster diving? Well, this was headed for the big playground bin, but I snagged it 1st! I think it mightve got put inside, but I knew it was in there. Heres another piece of audio equipment that seems to be unmentioned on the web. From my web search, I did find other Trakton gizmos related to Australia, but this was made in Taiwan. It mightve been a cheapo brand cassette player back in the day. It was certainly cheap for me I got it for free! Whod have thought that even back in my primary school days Id have gone dumpster diving? Well, this was headed for the big playground bin, but I snagged it 1st! I think it mightve got put inside, but I knew it was in there.
The radio is now the only thing working, as I think the motor died for the cassette part, and as thats what my school used these primarily for, that was its nail in the coffin. I think I also saw a double cassette one of these in yellow somewhere. You get 3 bands on this, AM, FM & SW, making it one of the few radios I have that can get shortwave stations. The range is from 3.2 MHz to 12 MHz. As a kid, I used to use it sometimes to look up the time signal station from Llandilo, so I could set my watch accurately. The 3 left knobs are tone, balance & volume. The buttons are pause, stop / eject, fast forward, rewind, play and record. Its got one touch recording, so you only need to press the record button, and it will pull down the play button for you. The big knob is obviously tuning, followed by the band switch and lastly, the radio / cassette switch.
Although you cant see it from the outside, there is a single microphone on the right side, next to the top right corner of the speaker. There seem to be 2 main PCBs 1 for the radio, and a main one on the back of the cassette area. The transformer is fairly small, and attached to the back cover. Although mine fell off, since the plastic shafts have busted. Ive tried some super glue, but I dont intend to use this cassette recorder all that much anyway.
As for powering it, you can use the built-in transformer or 4 C size batteries. The back of the case also has a 3.5 mm headphones socket. I mustve opened this once before, because Ive added a green L.E.D. on the back for something. As a kid I was often adding extra features. In terms of weight, this is really quite light, especially with no batteries. In terms of a date for it, I would say 1980-something. Or maybe very early 1990s though, since I finished primary school at the end of 1992.
Sharp System-CD550E (GY)
 This is a big bold burly body builders boom box! Even without the batteries, it weighs a tonne. Well, not really. Several kg by the feels of it. You get a double casette player, one side of which records, as usual, a 4 band radio and a top loading CD player. This used to belong to my grandfather, and its probably from just before the turn of the century. Now you usually just get AM & FM on the radios of these things, and SW if youre lucky, but this also has LW! Ill have to try that, because I think this is the only radio in the place with it. This is a big bold burly body builders boom box! Even without the batteries, it weighs a tonne. Well, not really. Several kg by the feels of it. You get a double casette player, one side of which records, as usual, a 4 band radio and a top loading CD player. This used to belong to my grandfather, and its probably from just before the turn of the century. Now you usually just get AM & FM on the radios of these things, and SW if youre lucky, but this also has LW! Ill have to try that, because I think this is the only radio in the place with it.
In my experience, Sharp do some odd things occasionally with their products, and this one does have some quirks. Not only is the headphones socket round the back, (like the Trakton doodad above,) but there are also 2 RCA sockets for a CD player only output. Whats the purpose of that ever?! And why only for the CD player? Theres also no line in sockets for other things you might want to record from, like VCRs, game consoles, DVD players, computers etc. As for microphones, I dont see any, and there are no sockets for them either. Youd have to use a transmitting microphone that you can tune into on FM or something. I tried recording on a cassette, and nothing. So this things a bit isolated really, when it comes to attaching anything else. But you do get dubbing between cassettes. Recording from the radio was fairly good though. (Recording is of the 1-touch variety, so when you press Record, Play goes in with it.)
In terms of electricity supplies, you get 2 choices. The built-in transformer, or 8 D size batteries! Holey moley! Youd probably have less in a prison yard brawl. It says on the back that it uses 50 W, so it probably flattens the batteries like a steam roller.
The 2 speaker boxes can be detached, but their wires arent overly long, so youll have to keep them close by. Youll want to keep the system away from other electrical things, like computers, because you seem to get a load of interference on the radio otherwise. When I tested it, in the same room as my PC, it sounded like some horrid 2 stroke engine. Taking it elsewhere was more successful. Short wave reception was good, and I got a few Asian stations. On long wave, all I could get was something that sounded like Morse Code at about 240 KHz. Except it seemed to be the same message each time. So I dunno what that was. If anybody knows, do write in and tell me.
The FM range is 87.6 MHz to 108 MHz, AM is 526.5 KHz to 1606.5 KHz, SW is 5.95 MHz to 18 MHz and LW is 150 KHz to 285 KHz.
The CD player works well, although the buttons operate in slightly odd ways, like repeat on the play button, and a separate pause button. The sound quality is what you would expect from a player of this size, but its not too bad really. I used to use it at Christmas time, over 10 years ago. All in all, it hasnt seen a whole lot of use, and I dont know how much Pa (my grandfather) used it either. Id say he probably used the cassette part the most. Theres a sliding X-Bass control near the equaliser, and like other double cassette players Ive seen, they have number 2 on the left, and 1 on the right. This is the opposite to my Sharp mini hi-fi system.
Check out the page at that Radio Museum site too, with some pics from me.

|
|