The Elder Scrolls 3: Morrowind — Game Of The Year Edition Page.
Originally I was playing my mate Jason’s copy of this game, but now I’ve got round to buying it myself. Anyway enough of my life story. Basically this is amazingly awesome to sum it up, and although you can now get the Game Of The Year Edition the original version is still a grand game on its own.
Previous Elder Scrolls games in the series were Arena & Daggerfall, and this is obviously the 3rd. (You can now download Arena & Daggerfall for FREE from the official site!) Unfortunately, I don’t know much about the previous games, but if this is anything to go by, they were probably excellent to play also. I have seen screenshots of Arena & Daggerfall, and Morrowind certainly does take a large leap graphically. Still, it is much more recent. Graphics aside, this would have to be the BEST RPG of all time. This game is huge, story wise, and “stage” wise. The play area being gigantic. This being the case, the XBOX has to load most of the “world” as it goes along. There are so many places and people, and lots of stuff in the game, that I cant even begin to mention it all. & then there’s the GOTYE. In this version you are also able to head up North West to Solstheim, or get teleported to Mournhold for even more amazing quests and so forth. Yum!
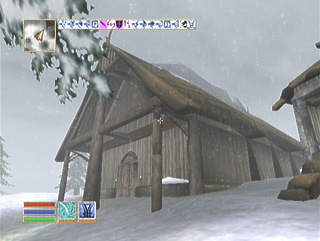
You start out
at the coastal town of Seyda Neen, recently released from prison by request of Emperor Uriel Septim. He believes you may fulfill a certain prophecy that could save Morrowind from the evil Dagoth Ur. Anyway, your quest to restore peace and goodness to the land is long and filled with danger, although unlike other RPGs that put you on a set path, The Elder Scrolls 3: Morrowind lets you decide what will happen and how you’re going to go about doing it. You can be a law abiding citizen that buys goods fairly, or you can be a nasty thief, and take what ever you want, killing who ever you want in the process.
Besides the main quest of the game, there are numerous side quests that can have multiple outcomes to keep you busy while youre gaining experience. Speaking of which, the game also features numerous books that you can pick up & read, which gives you knowledge. This then adds to your attributes, helping you to increase in level. Not only that, some books are quite interesting to read anyway.
|
|
|
|
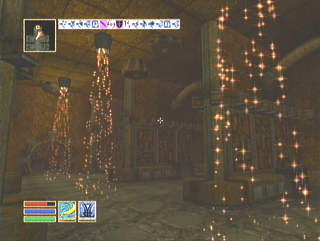
In the Hlormaren Propylon Chamber. Hmm, where to go to today…
|
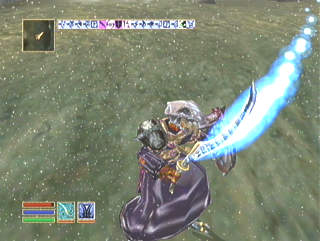
Me walking around Solstheim with Hopesfire. You score this nice weapon off Almalexia.
|
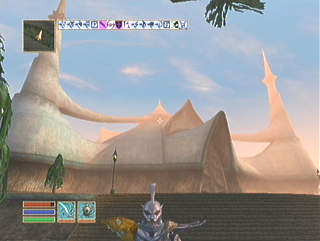
My mercenary posing in front of Almalexia’s Temple. :-P
|
One wouldn’t be well equipped without the proper armor and weapons, and the game is full of many various types. Adding to this, items can also be enchanted magically to how you want them. In Mournhold, at the Craftsmen’s Hall in Godsreach, you can even get custom armor made up to suit you personally. Simply bring the gold & materials and you’re in action.
Some of the best items youll find are the Daedric weapons which I believe are actually ebony weapons, but have reference to the Daedra — the gods and spirits of Oblivion. Eh, something like that. (Someone set me straight here.) The Daedric weapons are usually very effective and long lasting, and are worth quite a fortune, especially to those beginning the game. These beings have several shrines dedicated to them across the lands, and most of them are inhabited by evil worshippers. For the adventurous, these are the places to find good loot, plus a chance to pick up some extra quests. By “activating” a statue within the shrine, the Daedra will tell you what they want done.
You’ll also find the excellent light weight glass weapons & the rather expensive ebony types. Many of the weapons come in the form of axes, hammers, swords of all different lengths, spears, cross bows, staffs and even rudimentary clubs. Not only that, but you can cast magic spells that can inflict various forms of damage on your foe, or ones that have healing properties that you can use on yourself. Items in particular which are enchanted in some way, are some of the best ways to use magic. Other spells will use up your Magicka level, and scrolls generally can only be used once. If youre really lucky, however, you’ll find items that can be equipped with magical properties that are constant, and that only wear off when you take them off. These are more often than not expensive and also hard to come by.
You do however, have a limit on how much weight you can carry, and if you try to hold too much, you won’t be able to move. Luckily your strength can be increased by magical items that fortify the level, or simply by increasing your maximum strength when you increase in level. Certain items like keys and the like have no weight at all, which is a bonus, considering how many you’ll end up using.
|
|
|
 |
One of the rooms in the Clockwork City Of Sotha Sil.
|
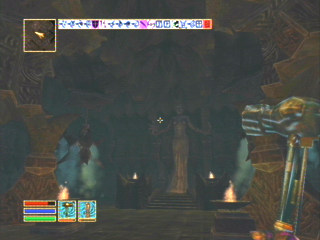
Inside Azura’s Shrine. There’s no baddies in here either, so come in for a snooze if ya need one.
|
Thirsk.
|
Bender from Futurama: “I love stealin’! I love taking things…”
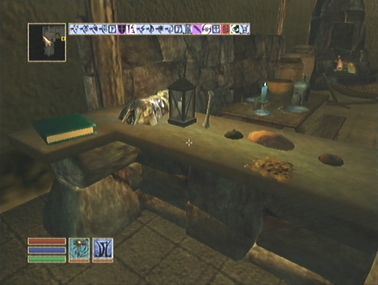
Now just how many games let you walk up to the plants that are growing, and let you pick off some leaves, or some berries? One of the things I find that is amazing about the game, is that you can pick up these various ingredients from plants & bushes, and also parts of animals, which can then be sold, or used on yourself, or even mixed into potions that you can create. All in all I find that rather sensational. Not only that, but if you happen to find some gold lying around, or perhaps a lantern, or some other good looking loot, you can pick it up and take it with you. Ah, of course some people don’t like you stealing, and usually if they don’t try and kill you, which is pretty easy for them at the start of the game, they’ll probably inform the guards, giving you a bounty. And not the coconut chocolate bars either. Hey, you do the wrong thing, you pay the consequences. If you get caught anyway!  You’ve got 3 options — pay a fine, if you have the money that is, go to gaol, or resist arrest. Resisting arrest is a bad idea, ’cos your bounty goes up further usually, and going to gaol ends up reducing your
skills. If you have no choice, and must commit a crime for a guild, or whatever, it’s best to pay up. The 1 problem here is that you’ll lose all your nicked items, whether you’ve been caught nicking them or not. The guards are good at telling that! The best trick is to dump everything you’re carrying, except your gold, and then fess up to a guard. They’ll fine you, but they can’t take your stolen items, because they’re on the ground. Simply go back & pick ’em all back up again. A little time consuming if you have a large inventory of stuff like me, but well worth it.
You’ve got 3 options — pay a fine, if you have the money that is, go to gaol, or resist arrest. Resisting arrest is a bad idea, ’cos your bounty goes up further usually, and going to gaol ends up reducing your
skills. If you have no choice, and must commit a crime for a guild, or whatever, it’s best to pay up. The 1 problem here is that you’ll lose all your nicked items, whether you’ve been caught nicking them or not. The guards are good at telling that! The best trick is to dump everything you’re carrying, except your gold, and then fess up to a guard. They’ll fine you, but they can’t take your stolen items, because they’re on the ground. Simply go back & pick ’em all back up again. A little time consuming if you have a large inventory of stuff like me, but well worth it.
I’m pretty much one of those people who has a collection of stuff in case I need it. I’ve probably got about 40 or more bottles of potions, about 60 scrolls, goodness knows how many keys, lock picks & probes, a small range of other ingredients, back up weapons, plus fairly often some loot also that I make my dosh from. There’s also a few books and other documents of interest in there too, that I like to read from time to time. One of my fave books is “The Locked Room.”
What am I wearing & using at the moment? Well, here’s an interesting list:
Sunder
|
Ebony Bracer Of Strength (by me)
Constant Effect:
Fortify Strength 8pts on self.
|
Wraithguard
|
Moon-and-Star
|
Daedric Shield Of Key (by me)
Constant Effect:
Detect Key (some distance I can't remember)
Fortify Magicka 10 points
|
Ebony Mail
|
Belt Of Sanguine Balanced Armor
|
Redas Robe Of Deeds
|
Daedric Greaves
|
Helm Of Oreyn Bearclaw
|
Juicy Shirt (by me)
Constant Effect:
Restore Health 1pt in 1ft on self.
|
Ring Of Azura
|
Daedric Right Pauldron
|
Daedric Left Pauldron
|
Gaenor’s Amulet
|
Aero Pants (by me)
These are a replacement I enchanted for the Travel-stained Pants, simply 'cos I got sick of going to the bottom of the list of magic stuff to get to the “T” Section
|
The Game Of The Year Edition lets you play the 2 PC version add on packs, Tribunal & Bloodmoon. As well as being able to continue straight on with your old saves, (i.e. if you had the 1st version of the XBOX game,) where you were in Vvardenfell, you can now get to Mournhold & the Clockwork City Of Sotha Sil, in Tribunal, and Solstheim in Bloodmoon — a frozen kinda island. The dudes programming the Game Of The Year Edition for the XBOX said they’ve got a virtually seamless product in terms of how it uses your old saves. The only problem is that you can’t delete them from within the game, but that’s such a minor problem, that I don’t think anyone would really give a hoot about it. Viewing the map now seems to be a bit more stable than the 1st version of the game, but you still get it dying on a couple of occassions, so it’s always an idea to save regularly. So far while I’ve been in Mournhold, I’ve barely had the game die on me at all, and saving seems to be quite quicker than it used to be also.
There’s obviously way too much detail in the game for me to mention every single location you can go to, let alone the people you’ll meet, and the creatures you’ll find. Rest assured though, you’ll undoubtedly enjoy every minute of the days you’ll literally spend playing through this game. There’s apparently over 100 hours of extra play time involved in the Game Of The Year Edition of this game, and knowing how I like to do other things for myself in the game, like looting, and re-arranging stuff in my “acquired” houses in Balmora, and now the one in Godsreach, I reckon it could very well be more than that. I’ve got so much loot now, I’ve been issued with an Overflow Loot Bag. But now that I’ve found people in Mournhold who have around 10000 gold, I’m going to sell off some of my more valuable items, such as my glass ware.
Anyway, don’t let me tell you how to play the game! The beauty of it all is that you play it how you want to play it yourself. I think that adds to the satisfaction factor more too.
One amusing place I found was Ignatius Flaccus’ house in Godsreach, where you can find the Robot Arena. This dude used to have battles with Dwemer Centurions, that is until they busted. Get him 10 pieces of scrap metal and 3 cogs, and you can watch a fight that you can also bet on! He keeps the bots behind a magic wall / shield, much like the Ghost Fence, and they battle it out until one is dead. Robot Wars eat your heart out.
New features in the GOTYE, are the ability to adjust the games’ difficulty from the options in various steps, and enemy characters now have a yellow health bar that appears above your own, so you know how far dead they are. You can also become a werewolf if you wish, and in Mournhold, you can hire people to follow you around and fight with you. Not only that, but pack animals as well, and you don’t have to pay them.
When you’re playing the game, you can naturally bring up the map on screen, and it will show you where you’ve been to, and where you haven’t. When you visit a specific location, or someone offers to mark a place on your map, a square will appear that shows you where that place is. There are 2 versions of the map also, (except for Mournhold,) the overall map of everything, and the more localised map, which shows you in more detail, your closer surroundings. Placing the arrow over the squares on the map reveals the names of those places. Once you’ve played the game for some time though, going to various places will require less use of the map, due to the fact that you’ll eventually recognize landmarks, such as the positions of trees & rocks etc. When you buy Morrowind, you also get a bonus map in the box, which I’m planning on having laminated to hang up. The original version of the game’s map shows you all of Vvardenfell, nice & large, and the GOTYE’s map is a little smaller, because they had to fit in Solstheim & Mournhold also. A sweet bonus this! Check out the Morrowind Store also, which is accessible through the link below, for such goodies as mouse pads, bags, mugs, posters etc. I picked up a cool T-Shirt for a good price also.
Overall, worth buying a XBOX just to play this game, and especially now that they’re so cheap and all. Seeing as how they’re pretty much identical, I can also recommend the PC version of the game, if you find that more to your liking. Both are in Aussie game stores now.
I picked my copy of the Game Of The Year Edtion up for $69.95, and you should find the original to be much cheaper.
Graphics: Absolutely stunning. Highly detailed buildings, characters, trees, & monsters. The detail also adds to the playability, whereby you have lots of plants that contain items, and areas that have lots of rooms you can go into and such. Theres also some pretty sweet looking water that ripples up where you move through it, and that dents with raindrops. Spiffy special effects, not insanely used, but to great effect. The architecture in Mournhold is fantastic also, and I love the colours in the textures that have been used. While the graphics are excellent, it’s good to know that the playability and gameplay was the main “objective.”
The video quality is a bit crusty looking, but the game isnt fully dependent on it anyway. 95%
Animation: Despite the huge amount of stuff usually on screen at any one time, especially in areas where you may have stock-piled about 100 items, it barely ever chunks up. Some enemies casting magic and a couple of rooms and the like do slow it up, but its nothing major to be concerned about. 85%
Sound: An amazing soundtrack by Jeremy Soule, also responsible for the likes of Ice Wind Dale, and was it Baldurs Gate also? I think he might have done Unreal 2 also. Anyway, the theme music is excellent, and is really powerful, and memorable. Great special effect sounds throughout the game, like fire noises, water splashes, and top notch clear speech. Nice
effects when you crack out your weapon, especially that “ching” noise when you draw a big juicy sword out. Excellent. 99%
Playability: Unbelievable. This is challenging, and yet very, very playable from start to finish. Completing tasks are usually very rewarding, and the element of exploring makes this exceptionally fun. Once you’ve completed everything, and who knows how long that will take you to do, you can always start again with a new character and perhaps do things differently the second time round. 98%
Lastability: Even when youve completed the game, theres still truckloads to do, if you didnt do certain things earlier on. I just love cracking this out over and over again. 99%
Overall: A must have if you love RPGs. This belongs in everyones XBOX collection. Absolutely awesome. The only real fault is a known bug in the game that will tell you that your disc is dirty and to press A to retry. This often occurs when you have a lot in your inventory and when you access the map on occasions. You will need to reload from time to time, and may even have some of your save files corrupted, but the game is too good to even worry about this fault. It seems to have been given some more attention for the Game Of The Year Edition anyhow, and in the likes of Mournhold where Ive been mostly, Ive only had it die about once. People, this is what gaming is all about. 99%
Check out: http://www.elderscrolls.com/ — the official site.
Also check out my own stuff on the PC version.
John’s Bonus Tips & Other Interesting Stuff:
Although most of the quests are quite obvious in what you have to do, some are a little more obscure or tricky. Here’s a few pointers on some of the stuff I got stuck on, plus other handy hints:
• Finding Gambolpuddy to renew the pact with Sheogorath & the Temple — When you’re told to go to the Daedric Shrine to find the glove, it isn’t very obvious where it is. It’s actually hidden under a pillow, and you can take the glove without removing the pillow also — it’s just hard to see.
• The Puzzle Canal and the Grace Of Courtesy Shrine — where is it, and how do you get to it? 1stly it’s on the 3rd level of the puzzle canal. You need to get to the centre section. Once inside you’ll be in a room full of water. A triolith there says something like: “Breathe in his holy water and the way shall be clear.” Although it may seem like a riddle of sorts, it’s actually quite simple. Go under the water and drown yourself. Before you die, the screen will go dark, and the staircase will vanish and be replaced by a bridge. The magic wall will also disappear, and your health will be restored fully. Talk to the Dremora, Krazzt, or whatever his name was, and give him a silver long sword. You’ll find 4 in the chest there.
• The 3rd piece of Nerevar’s sword (G.O.T.Y.E. only) — The easiest part to get is the blade piece from Karrod near King Helseth, but the 3rd bit isn’t quite as obvious. Almalexia says that it’s close by in Mournhold, but not exactly where. I searched the complete underground system for this, but it is in fact at the Museum Of Artifacts in Godsreach. You need to donate a couple of items 1st, and as compensation, you’ll get a shield with the sword piece stuck on it.
• Talking to Graring about the Stalhrim (G.O.T.Y.E. only) — this dude just doesn’t wanna yack at all. But if you kill Coventina Celata, who apparently is trying to kill him, he will respect you, and you can get chatting. Very tricky to find out, because there was no indication that Coventina wanted to kill him.
• When Sheogorath asks you to kill the Giant Bull Netch way up north, with the Fork Of Horripilation, you don’t have to do all the work with it. It’s easier to crack out something a bit more juicy, like Keening for instance, get the netch’s health down to about say 1/20th, and then change to the fork to finish it off.
• This is more of a bug than anything else (G.O.T.Y.E. only) — After you visit Kolfinna near the river in Solstheim, she’ll tell you about how she wants wergild for her husband’s death, by getting Pinetear from Sigvatr The Strong. Bring it back, and she’ll thank you, inviting you into her home, as well as giving you the key to her hubby’s chest. The thing is, you can go back to Sigvatr, and get Pinetear off him again, and return it to Kolfinna a 2nd time. She’ll then give you another key to the chest. And you can repeat this over and over and over and you’ll get key after key after key.
•
Another interesting quirk is the ability to lock the large snowy Holly Bushes in Solstheim. I’m not sure if it can be done with any of the other plants, because
it seemed to me to be only this particular one. It’s weird when you come up to it, and it’s like: “Holly Bush - Lock Level: 5.” Of course you need to unlock it again to gain the contents off it.
• If you’re thinking of doing enchanted items with a constant effect magic, and are not sure what beastie you should go after, get yourself into Red Mountain and do a soul trap on an Ascended Sleeper - these fit into a Grand Soul Gem, and should bring you a value on it of 80000 gold pieces. There are probably other creatures that will be good enough for the constant effect dealie, but this one is the one I definitely know. I’ve got an ebony pauldron giving me extra strength, and a shirt giving me constantly restored health now. I also made up a ring that has a constant effect of summoning a Scamp too. The only thing is that you need to take it off and put it back on again if the guy ends up dying. Plus you need to remove it when going into town. 
• Don’t bother making up your own enchanted items specifically for your mercenary in Mournhold, because half the time they don’t work. I made a shield to increase his strength, but it only works sometimes, and he gets over encumbered when it doesn’t.
• If the Ordinators in Vivec and Mournhold aren’t attacking you, you can still get rather valuable armour from the goblins in Mournhold. It’s not quite as plentiful, but still it’s there.
• If you’re heading down to The Lost Dwemer Checkpoint Of Mudan, or whatever the heck it was called, (south of Vivec,) I found it handy to get the Puzzle Canal Blessings on the way so you can take your own sweet time while you’re under water.
• One of the missions for (if you’ve joined with) The Temple, is to get yourself way up to the north to the Sanctus Shrine, I think it is, under a vow of silence. That means no talking to Silt Strider, Mages Guild or boat people for transport. So instead of walking the whole way, it’s a clever idea to use the Propylon Chambers at the old Dunmer Strongholds, and if you have all the indexes, then it’s gonna be no problem. Then if you’ve got Barilzar’s Mazed band (from the Game Of The Year Edition), you can teleport straight back to Vivec, without needing to use a Mark spell before you leave.
•
To get the Daedric Crescent, go to Tel Fyr, and open the Small Ornate Lockbox on the left of Divayth Fyr. (His right.) You’ll need to plunder the Corprusarium for the key, or be able to open the lock level of 100. The key isn’t hard to find, so you might as well go down and get it. Inside, you’ll find Divayth’s 1155th Key, possibly a Dwemer Coin and the main event, the Daedric Sanctuary Amulet. It has no enchantment, but it’s worth 3100 gold pieces. Put it on, and you’ll be asked if you’d like to travel to Magas Volar. Choose “Yes” and you will be sent to a Daedric Shrine where you must take on the Lord Dregas Volar, who appears as a Dremora. Once you kill him, the amulet will be removed and in its place you’ll receive Volar’s own weapon, the Crescent Blade. It’s classed as a 2 handed long blade. Chop is 15 - 40, Slash is 20 - 50 and Thrust is 5 - 15 on damage. It also does Disintegrate Armour 5 - 30 points and Paralyze for 10 seconds. The value is 180 000 gold, and the weight comes in at 35.
• On the stranger side of the game, you’ll come across the utterly bizarre Talking Mudcrab Merchant. This fella looks exactly like an ordinary mudcrab, so be careful not to kill it.
It’s located on an island just to the east of Mzahnch, the Dwemer joint. You need to come south from the entrance to the ruin, to the shore of that part of land, and then east from there. The crab has bottles of booze for sale, and has 10 000 gold to buy some of your more expensive items. When you look at it, it just says “Mudcrab,” so keep your eyes peeled. I dropped a torch there incase I was ever back in the area. Another peculiar fella is the Scamp in Caldera at Ghorak Manor, called (a) Creeper - it also buys items at full price, but only has 5 000 gold.
• One amusingly satisfying part of the game for me is locking the Ordinators in prison, in a couple of the places in Vivec that actually have gaols. The Ordinators are always attacking me, so locking them up is always a bit of extra fun. The trick is to lure them into the cell, and then shut the door, finally locking it up, before Almsivi Interventioning yourself outta there again. Of course if you nick the key too, you’re in complete control. What would be interesting is to cast a Mark spell outside 1st, then when you’re locked in the prison with the ordinator(s), instead of doing the Almsivi Intervention, summon a bunch of Daedra, and then Recall to watch them duke it out.
•
Here’s some ideas that I use for transporting myself quickly from place to place. At the Bloodskal’s House in Solstheim, I have my Mark position located there, so it’s always easy to get to Solstheim without having to make my way to Khuul. Then if I want to get to Raven Rock for instance, I just use a Divine Intervention on one of my amulets, and pop up at Fort Frostmoth, which is a short walk to the boat dude. Of course using Almsivi Intervention from Solstheim will take you back to Gnisis. Using Barilzar’s Mazed Band is great for getting to Vivec from up north and for getting to Mournhold without having to go to Ebonheart. And for getting back to Ebonheart, you can just teleport to Mournhold, then walk to the palace, and have that fella there teleport you. I always look for handy, quick ways to move about vast distances, and there are some pretty cunning ways you can do it if you know all the tricks of the trade. Using a combination of the Propylon Chambers, Mages Guild, Silt Striders, boat services, intervention magic and the Mazed Band can make travelling really easy.
• Check this page out for a list of items in the game. Rare stuff like the Bone From Pop Je, the Bittercup, Ashes Of G. Lyngas etc are listed here too. Click here to see the Easter Eggs at The Imperial Library.
A few rarer items in the game lined up together. From the left to the right are: Capn’s Guide to the Fishy Stick, Dragonbone cuirass, The Watchman’s Eye (just north of the Skaal Village), Bone from Pop Je, Ashes of G. Lyngas, Muffin, Meteor Slime & Poison (found near Peke Utchoo in The Lost Dwemer Checkpoint Of Mudan), at the front there.
• Here’s where to find some of the rarish items that I mentioned above: Capn’s Guide To The Fishy Stick is a book on an ancient ship wreck just a little south east of Dagon Fel. Also just north from there, and a little further east is M’Aiq The Liar, who has some very peculiar stuff to talk about. ;-) The Bone From Pop Je can be found in Senim Ancestral Tomb, which is in the same kinda area. It’s to do with some guy called Gary Noonan that worked on the game. The Poison can be found near this dead guy called Peke Utchoo, which I already said about above. This area is where you’ll find that cuirass as well. The Ashes Of G. Lyngas I can’t remember, and haven’t looked up again… The muffin is on an Orc dude called Gakkenfeld at the Gro-Bagrat Plantation, which is just north of the Hlaalu Canton of Vivec. You’ll also find a key on him that opens the doors to a secret Skooma lab of sorts. The Gro-Bagrat guy is down there with some woman, and they’ll probably want to kill you for finding the illegal activities. One of the really cool items you’ll find, is in the beak of the dead Cliff Racer hanging in the Greathall of the Skaal Village. It’s called BlueDev’s Ring Of Viewing, and although it looks like a plain old boring ring, putting it on actually allows you to view 6 Bloodmoon related videos! In Vivec at the Foreign Quarter, at Jobasha’s Rare Books, you’ll also find the rare Charles The Plant, which contains Meteor Slime. It’s the same as Scrib Jelly though. There’s also the Ashes Of Lord Brinne somewhere, and some other guy that really did die in real life. If I come up with some other interesing items that I’ve found, I’ll list them here.
Potions & Stuff:
All of these I worked out for myself, wihout looking stuff up on the ’net or in books, so check out some handy ingredient combos that you can use. These were all done with a mortar & pestle, and I’ve listed the combinations that use ingredients that grow back or are very easy to come across, rather than rare items like the Wolfsbane, Grahl Eyeballs and so forth. It’s all pretty easy to do anyhoo… Oh yeah, and stuff with this symbol: ‡ is for the Game Of The Year Edition only.
• If you wanna find a way into making up some good Detect Key action, I found that using a spore pod and a diamond will give you a pretty decent potion. Better still, you can use the common old muck, instead of the diamonds. Using my Master’s Mortar & Pestle, (I fink,) I got 103 seconds within 34 feet with a value of 103 & weight of 0.1. It’s probably listed in some book for all I know, but I figured this one out myself, and thought the results were quite good.
‡ • To make up a levitation potion, grab some Sweetpulp from those cactus things, (Flowering Sweetbarrel or Desert Sweetbarrel in Mournhold,) and some Trama Roots, and mix them up. Add in some Saltrice also for some restore health action.
‡ • For Restore Agility, use some Bonemeal & Scrib Cabbage
‡ • Restore Endurance: Scales & Timsa-Come-By Flowers
‡ • Invisibility: Bittergreen Petals & Lloramor Spines
• Telekinesis: Bonemeal & Scuttle
List Of My Joints:
Here’s a list of the places I claim as my own. Some are posh and sprawling, others are just a little haven to stay for the night, but all are used to store my loot. (In no particular order.)
Place:
|
Location:
|
| 1. Caius Cosade’s House |
Balmora |
| 2. Nerano Manor |
Balmora |
| 3. Dura gra-Bol’s House |
Balmora |
| 4. Velas Manor |
Godsreach |
| 5. The Blodskaal’s House |
Skaal Village |
| 6. Erna The Quiet’s House |
Skaal Village |
| 7. Carnius Magius’ Room |
Imperial Cult Shrine, Fort Frostmoth |
| 8. Carius’ Chambers |
General Quarters, Fort Frostmoth |
| 9. Uryn Maren’s House |
Raven Rock |
| 10. Factor’s Estate |
Raven Rock |
| 11. Thirsk |
|
| 12. Arvs-Drelen |
Gnisis |
| 13. Trap Door Basement area at the Barracks |
Gnisis |
| 14. The room on the left in Sarethi Manor |
Ald’ruhn |
| 15. Fighter’s Guild |
Foreign Quarter, Vivec |
| 16. The joint where the slaves were |
Telvanni Canal Works, Vivec |
| 17. Telvanni Monster Lab |
Telvanni Canal Works, Vivec |
| 18. St. Delyn Canal South-Two |
Vivec |
| 19. St. Delyn Waist North-One |
Vivec |
| 20. St. Delyn Waist North-Two |
Vivec |
| 21. The upstairs room right at the back of Skenk’s Shovel |
Caldera |
| 22. Tel Uvirith, Tower Lower |
Tel Uvirith |
| 23. Menas’ House |
Tel Uvirith |
| 24. Venim Manor Bedrooms |
Ald’ruhn (under Skar) |